

Multiliner Pens and Watercolor: The Perfect Combination for On-The-Go Artists
Most of the visual art I create these days is digital, using my trusty iPad.
But every so often I love to return to some tactile roots and grab my sketchbook, Multiliner pens and travel watercolor kit. There’s nothing like setting up on location to capture some sights and experiences that are playing out right before you. It’s a great way to remember moments, special or ordinary.
If you’re new to the sketch scene, or returning after some time away, here are some pointers to help you navigate your sketch opportunity!
Multiliner pens are a versatile tool that can be used for a variety of drawing techniques. They are especially well-suited for drawing on the spot, as they allow you to create precise lines and details. If you want to add a touch of color to your drawings, you can also use watercolor. (That really makes your sketches sing!)
Here is a step-by-step guide on how to combine multiliner pens and watercolor:
Choose your subject. This could be anything from a landscape to a portrait to a still life.
Sketch your subject using a multiliner pen. Use light lines so that you can easily adjust them later if needed.
Add details to your sketch using a thicker multiliner pen.
If you want to add color, dilute some watercolor paint with water.
Use a brush to apply the watercolor to your drawing. Start with light washes and build up the color gradually.
Let the watercolor dry completely.
Need some tips for combining multiliner pens and watercolor?
Use a high-quality watercolor paper. This will help to prevent the watercolor from bleeding through the paper.
Be careful not to overwork the watercolor. Too much water can make the paper buckle.
If you make a mistake, you can erase the watercolor while it is still wet.
Experiment with different colors and techniques to find what works best for you.
Combining multiliner pens and watercolor is a great way to create detailed and colorful drawings. With a little practice, you can learn to create beautiful and unique artwork.
Here are a few additional tips to help you succeed:
Use a light touch when sketching with the multiliner pen. You can always add more lines later, but it is difficult to erase lines once they are drawn.
If you are using a watercolor pencil, you can apply the color directly to the paper without diluting it with water. This will give you a more opaque color.
You can also use watercolor markers to add color to your drawings. Markers are a quick and easy way to add color, but they can be more difficult to blend than watercolor paint.
With a little practice, you will be able to create beautiful drawings that combine the precision of multiliner pens with the vibrancy of watercolor.
So get out there and start experimenting!
What's in my Sketch Bag, Part 1

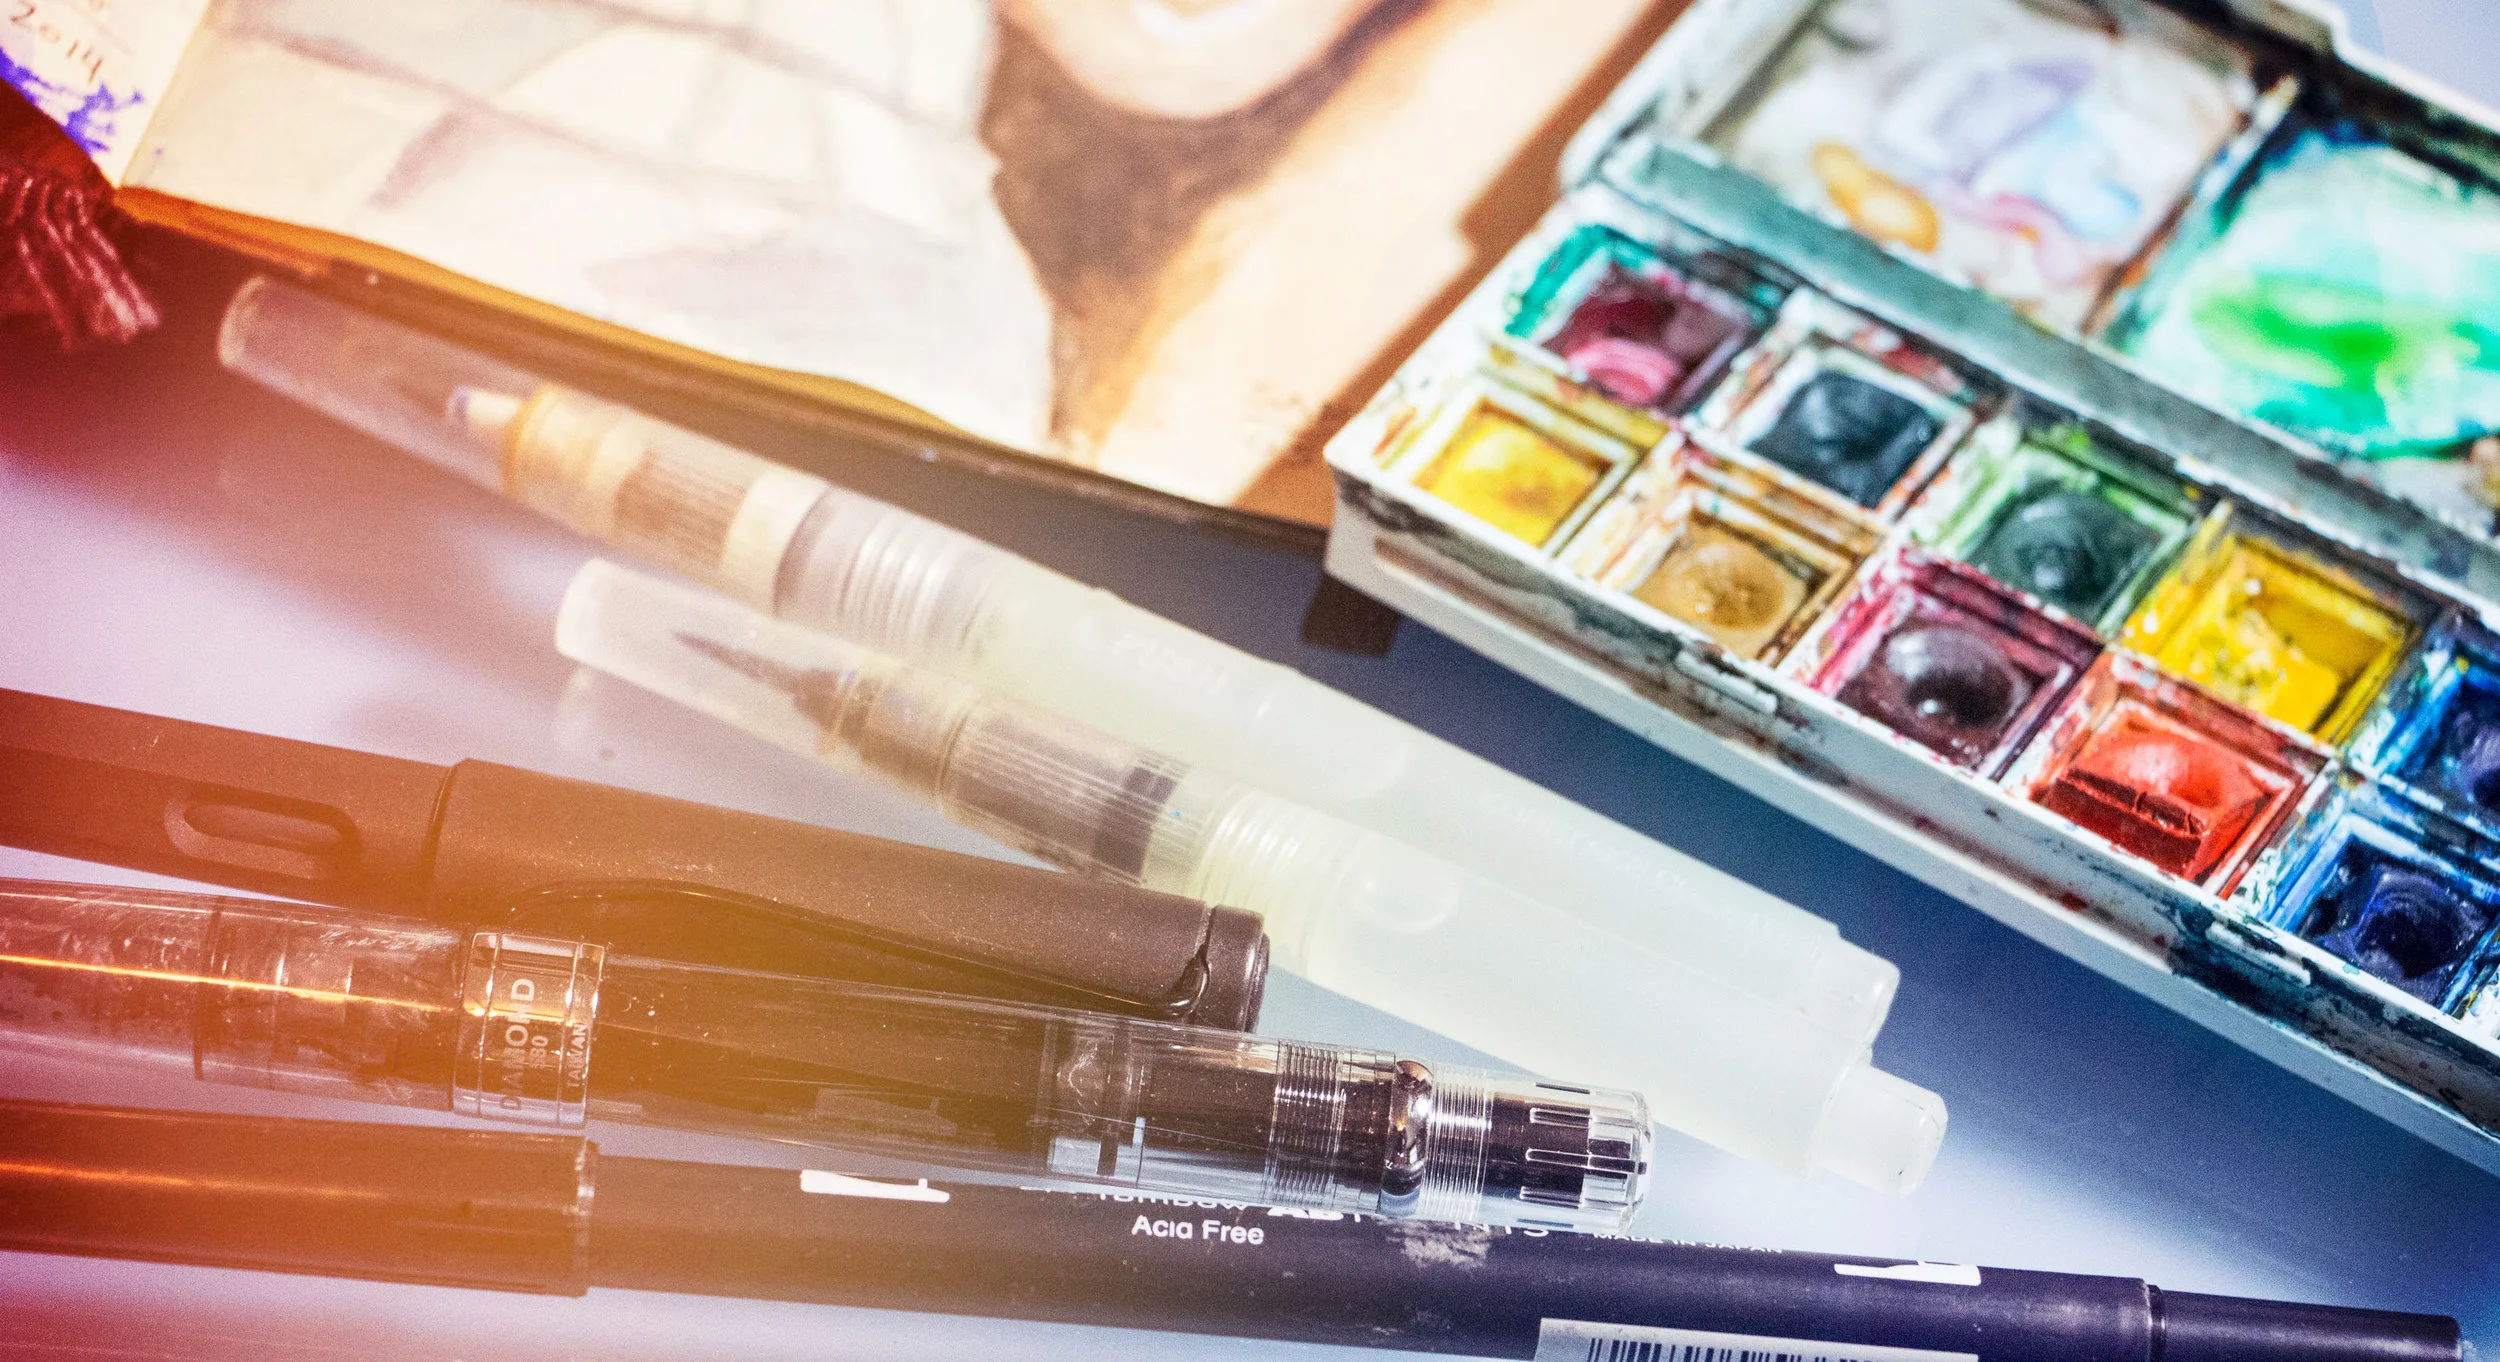
I thought I'd take a few minutes to share a few tools in my sketch bag. When I'm not sketching digitally on my iPad, Here's a few tools I like to keep handy for sketching while I'm out and about. I've provided amazon affiliate links below for easy purchasing as well if you're in the market or want to try some new supplies.
A great little fountain pen that is a no mess solution and has a great feel in drawing is the Lamy Safari pen (Extra Fine Nib). It's a great option if you're looking to get something affordable yet a step up. Be sure to get the Lamy refill converter as well, so you can use the ink you desire (waterproof and your color of choice) or you'll be limited to the available non-waterproof cartridges.
LAMY Safari Fountain Pen Charcoal Ex-Fine (L17EF)
Speaking of ink, I have found the Pilot Bamboo Charcoal Black a nice smooth black ink option. It's rich yet over done. You might want to experiment with a few brands of inks, but if you intend to use with watercolor paints, you will want waterproof ink.
Pilot Iroshizuku Bottled Fountain Pen Ink, Take-Sumi, Bamboo Charcoal, Black (69224)
The TWSBI fountain pen was my first. I was attracted to it because of the ease of use yet versatility. It does require more maintenance than the Lamy, but also has a well (that you can see how much ink is left if you get the clear barrel model) as opposed to a cartridge. It's a bit tricker to use but another great option if a full on fountain pen is intimidating.
TWSBI Diamond 580 Fountain Pen nib EF or F
There are certain moments that you will want to blend ink, so using a water-soluble ink will be your ticket. You can fill one of the pens above with such an ink, or if you'd like a different option check out the Tombow. It had two sides and is a BRUSH pen as opposed the extra fine nibs on the fountain pens. One side is like a brush, the other is like a fine tip marker.
Tombow Dual Brush Pen Art Markers, Black N15, 6-Pack
I live for color, so I always have my Windsor and Newton Watercolor travel kit handy. There are a ew different sizes, depending on how many pans of color you want available. I suggest starting with the one I've listed as it's a little more budget friendly as well as more compact for travel. When the pans of color run down, they are easily replaced. You can even swap out colors if the stock colors aren't your colors of choice. This set is a staple of my travel bag. I never go anywhere without it.
Winsor & Newton Cotman Water Color Compact Set
And if you intend to use watercolors, you'll need a handy option for brushes that travel well. You don't want to be fiddling with brushes and water cans while on the go, so these water brushes are a necessity. This set has 4 size options which is also nice. You just unscrew the cap and fill with tap water at home, or refill on the go. Simple.
Water Brush Pen, Self-moistening, Portable, (Assorted Tips, Set of 4)
And Lastly, there's a myriad of options for your sketchbook, and a lot of it is personal preference. I do suggest however that if you are planning to use watercolors or wet media, get a sketchbook with watercolor paper. I've used the Moleskine Watercolor sketchbook. It's taken some getting used to the size, but it captures my watercolor nicely. I've also used other Moleskine (as well as other brands) that weren't watercolor paper but with varying degrees of success. It might come down to how wet the paint is.
Moleskine Art Plus Watercolor Album, Large, Black, Hard Cover (5 x 8.25)
The point is to get out there and start sketching! Try different supplies as your budget allows. Go with friends, and swap supplies. Now get out there and sketch!
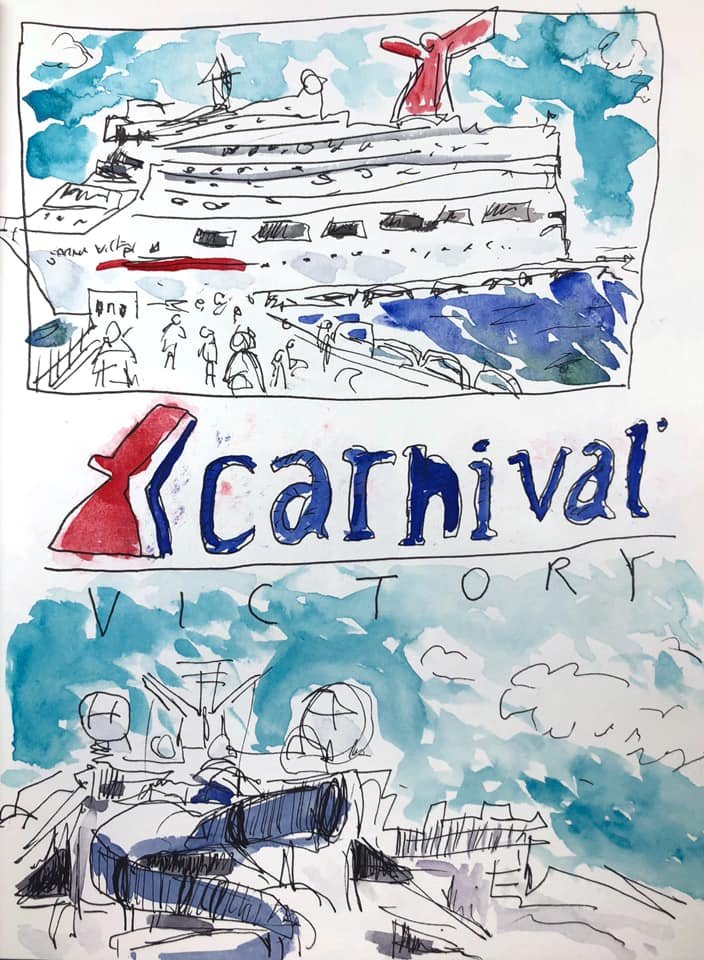
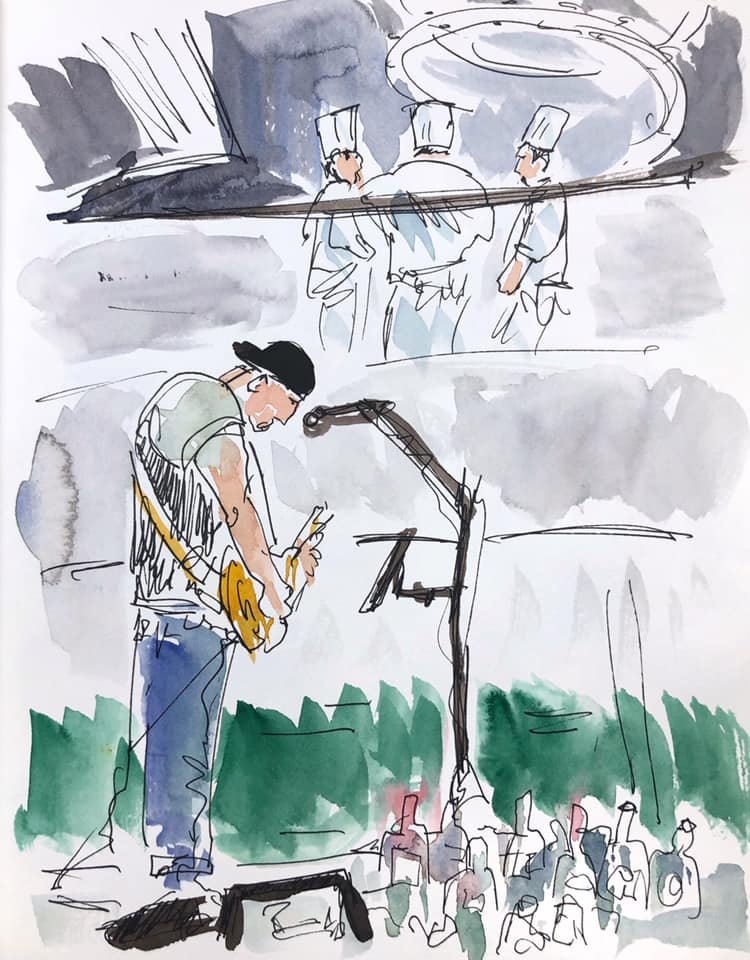
Time-lapse Drawing of Concert
Here's a quick pen, watercolor and pencil sketch of a concert photo. Enjoy!
A Quick Sketch
A quick time lapse video of me sketching in my Moleskine watercolor sketch book.
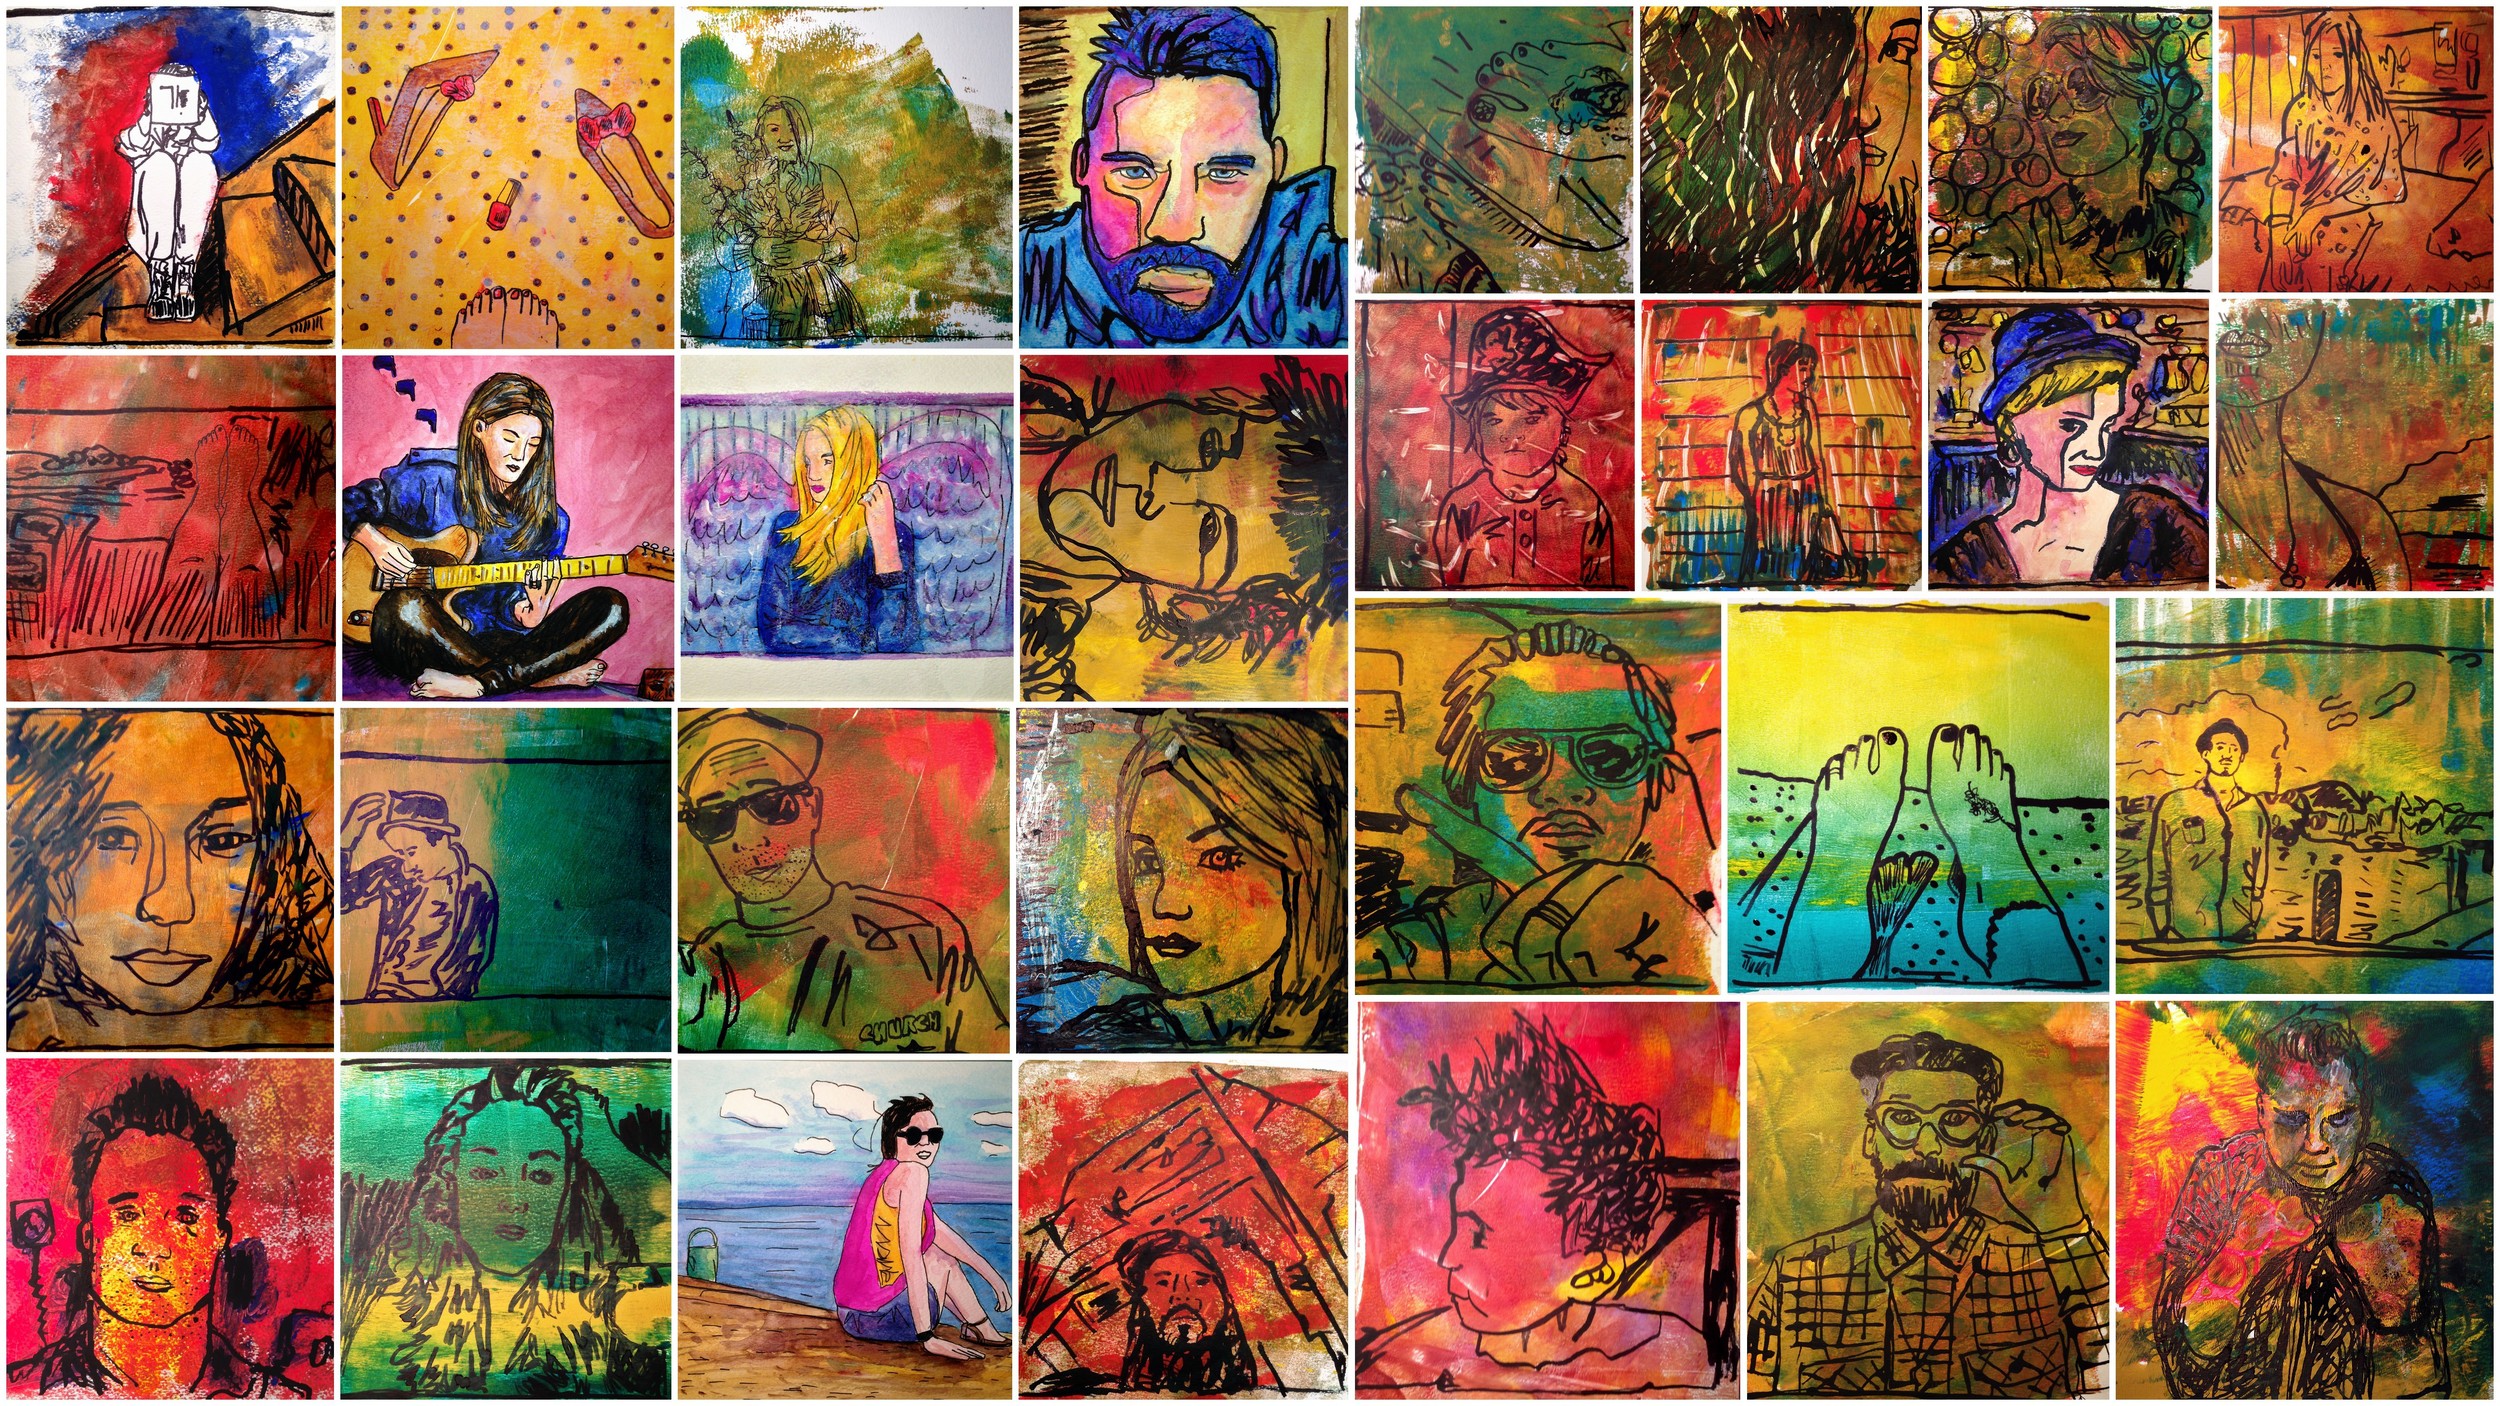
30 Paintings in 30 Days Complete Project
Here's a look at the 30 days all together in one collage. Enjoy!
30 in 30: Day 12
Day 12 of my 30 paintings in 30 days challenge. I'm using sketches i created from Instagram photos on my iPhone I did as part of a 100 day project and turing 30 of them into paintings. User: @caitlincrosby (photo by @jasminestar)
Original Instagram photo:
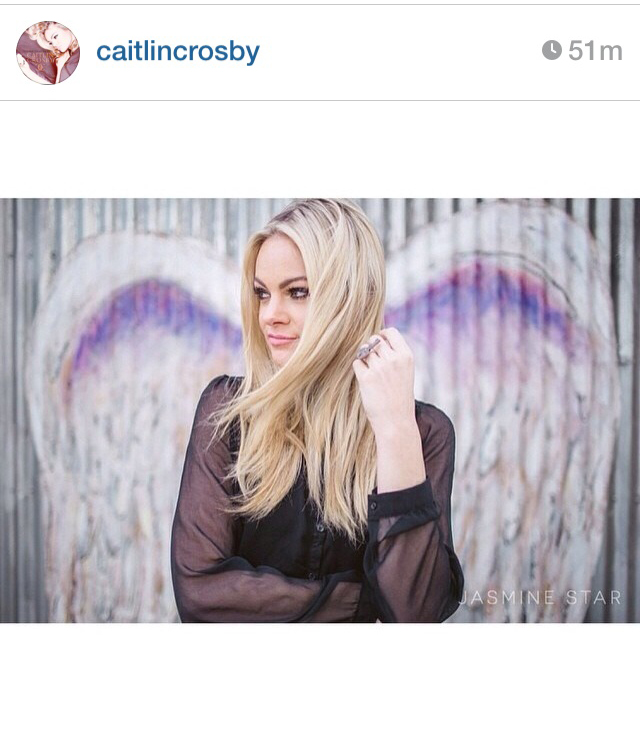
100 Day iPhone Sketch:

30 in 30 day painting:

Acrylic & Ink. 8 x 8 on 140 lb. watercolor paper.
When Art Emerges
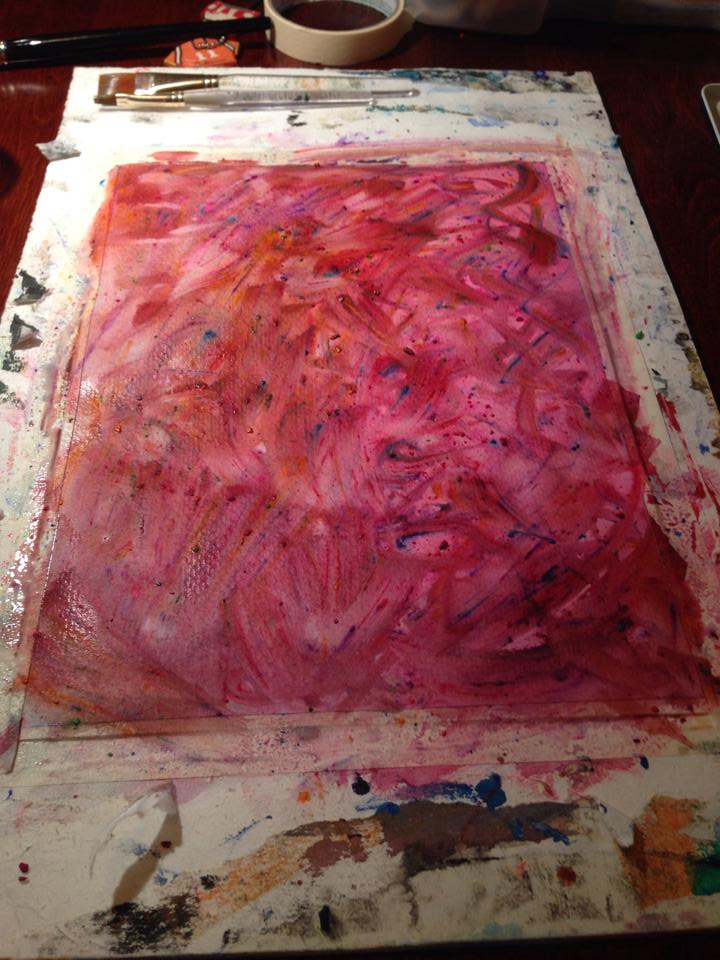 One day a few weeks ago I decided I wanted to create something new, but I wasn't sure what. I started with just throwing down some watercolors, then took an X-acto knife to make shavings from my watercolor crayons. I spread these shaving out randomly on top of the previous (dried) watercolor. Then I grabbed a spray water bottle and sprayed around on the shavings until they started to dissolve a bit. I let that dry and washed over again with some more watercolors.

At this point I still wasn't sure what this work would become. I knew I had created a base to work off, but that was all. As I sat pondering, I felt a need to express something that would speak about a current social issue. Having been on a trip to Nicaragua this May to help bring clean water to a village, I decided that was what this piece was about. I found some reference photos to use as inspiration, and set to drawing with black Take-Sumi ink using a bamboo pen. Once the ink dried, I carefully went back in adding some yellow gouache.
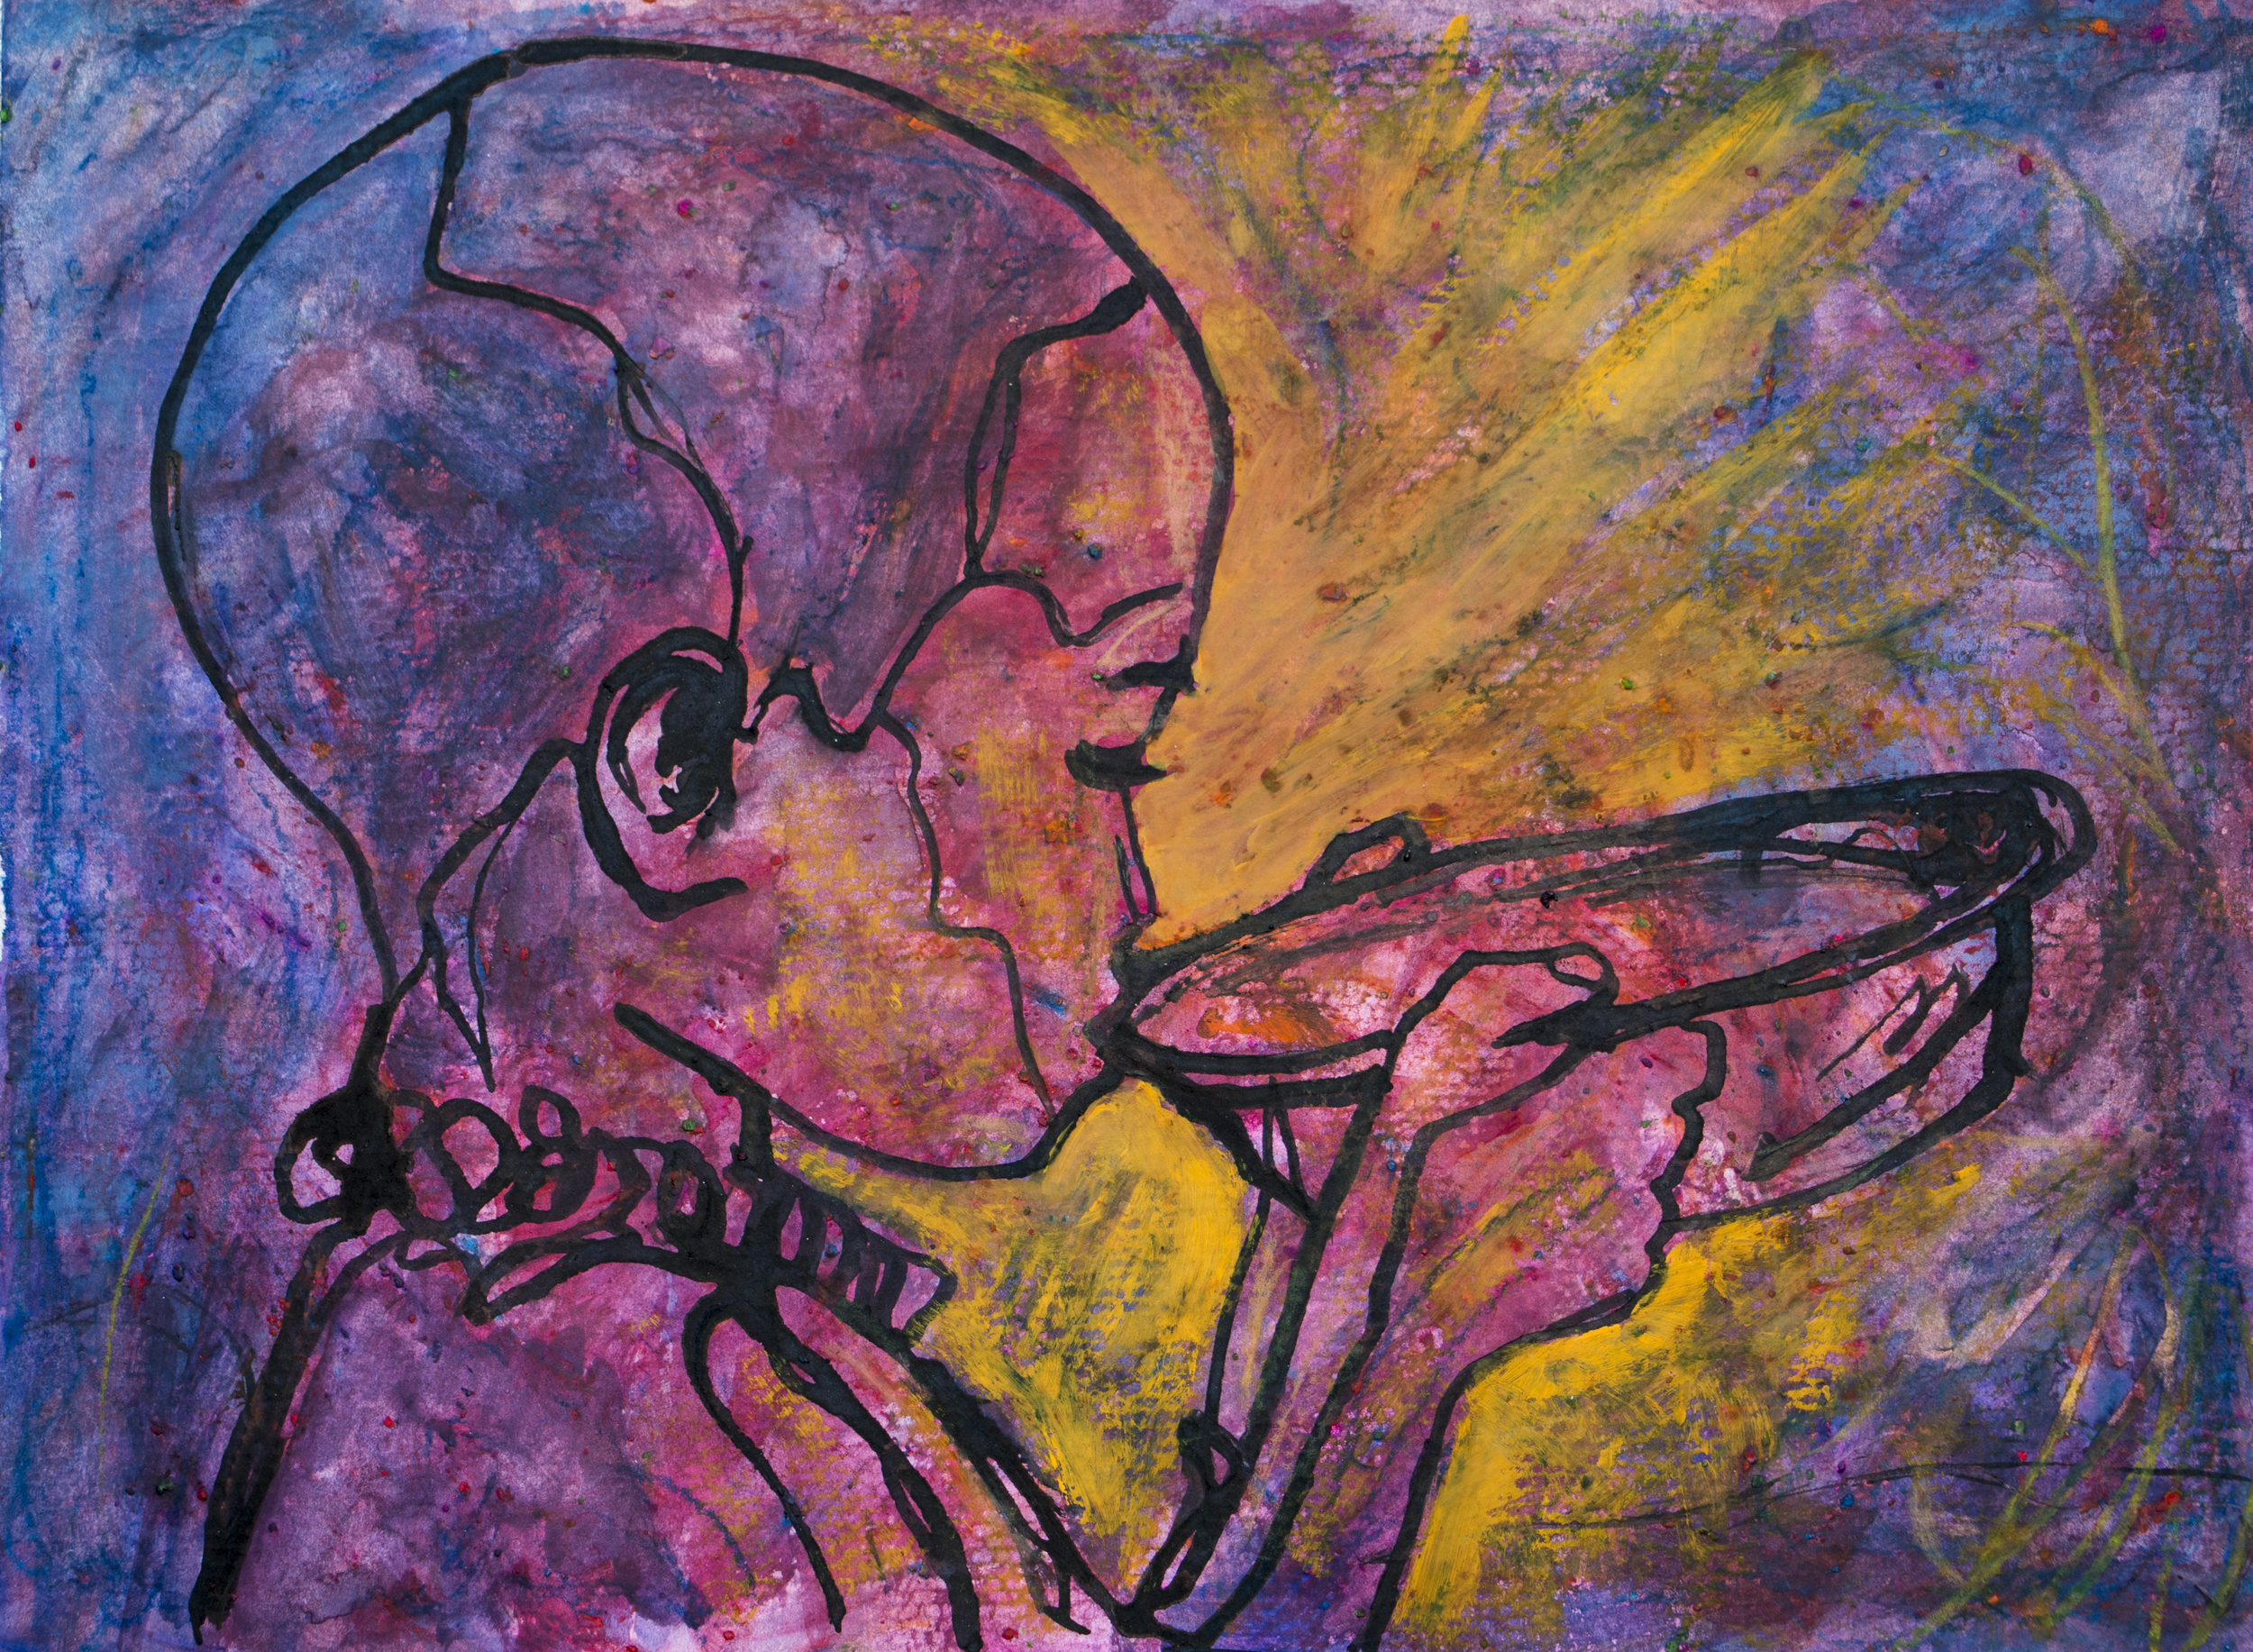
The result was something that spoke to a lot of people, about an important issue. "A Cup of Water for the Least of These." I recently sold the original as well as some prints. Sometimes, you just need to follow inspiration where it takes you. Sometimes I plan out what I'd like to do, but other times I like to just "play" and see what comes. There is tremendous freedom in that!
If you're interested in donating money to help provide get clean water visit here.
If you'd like to purchase a print of this or other work of mine visit my society6 shop!
2 Weeks. 72 Sketches. 1 unforgettable week in Nicaragua.
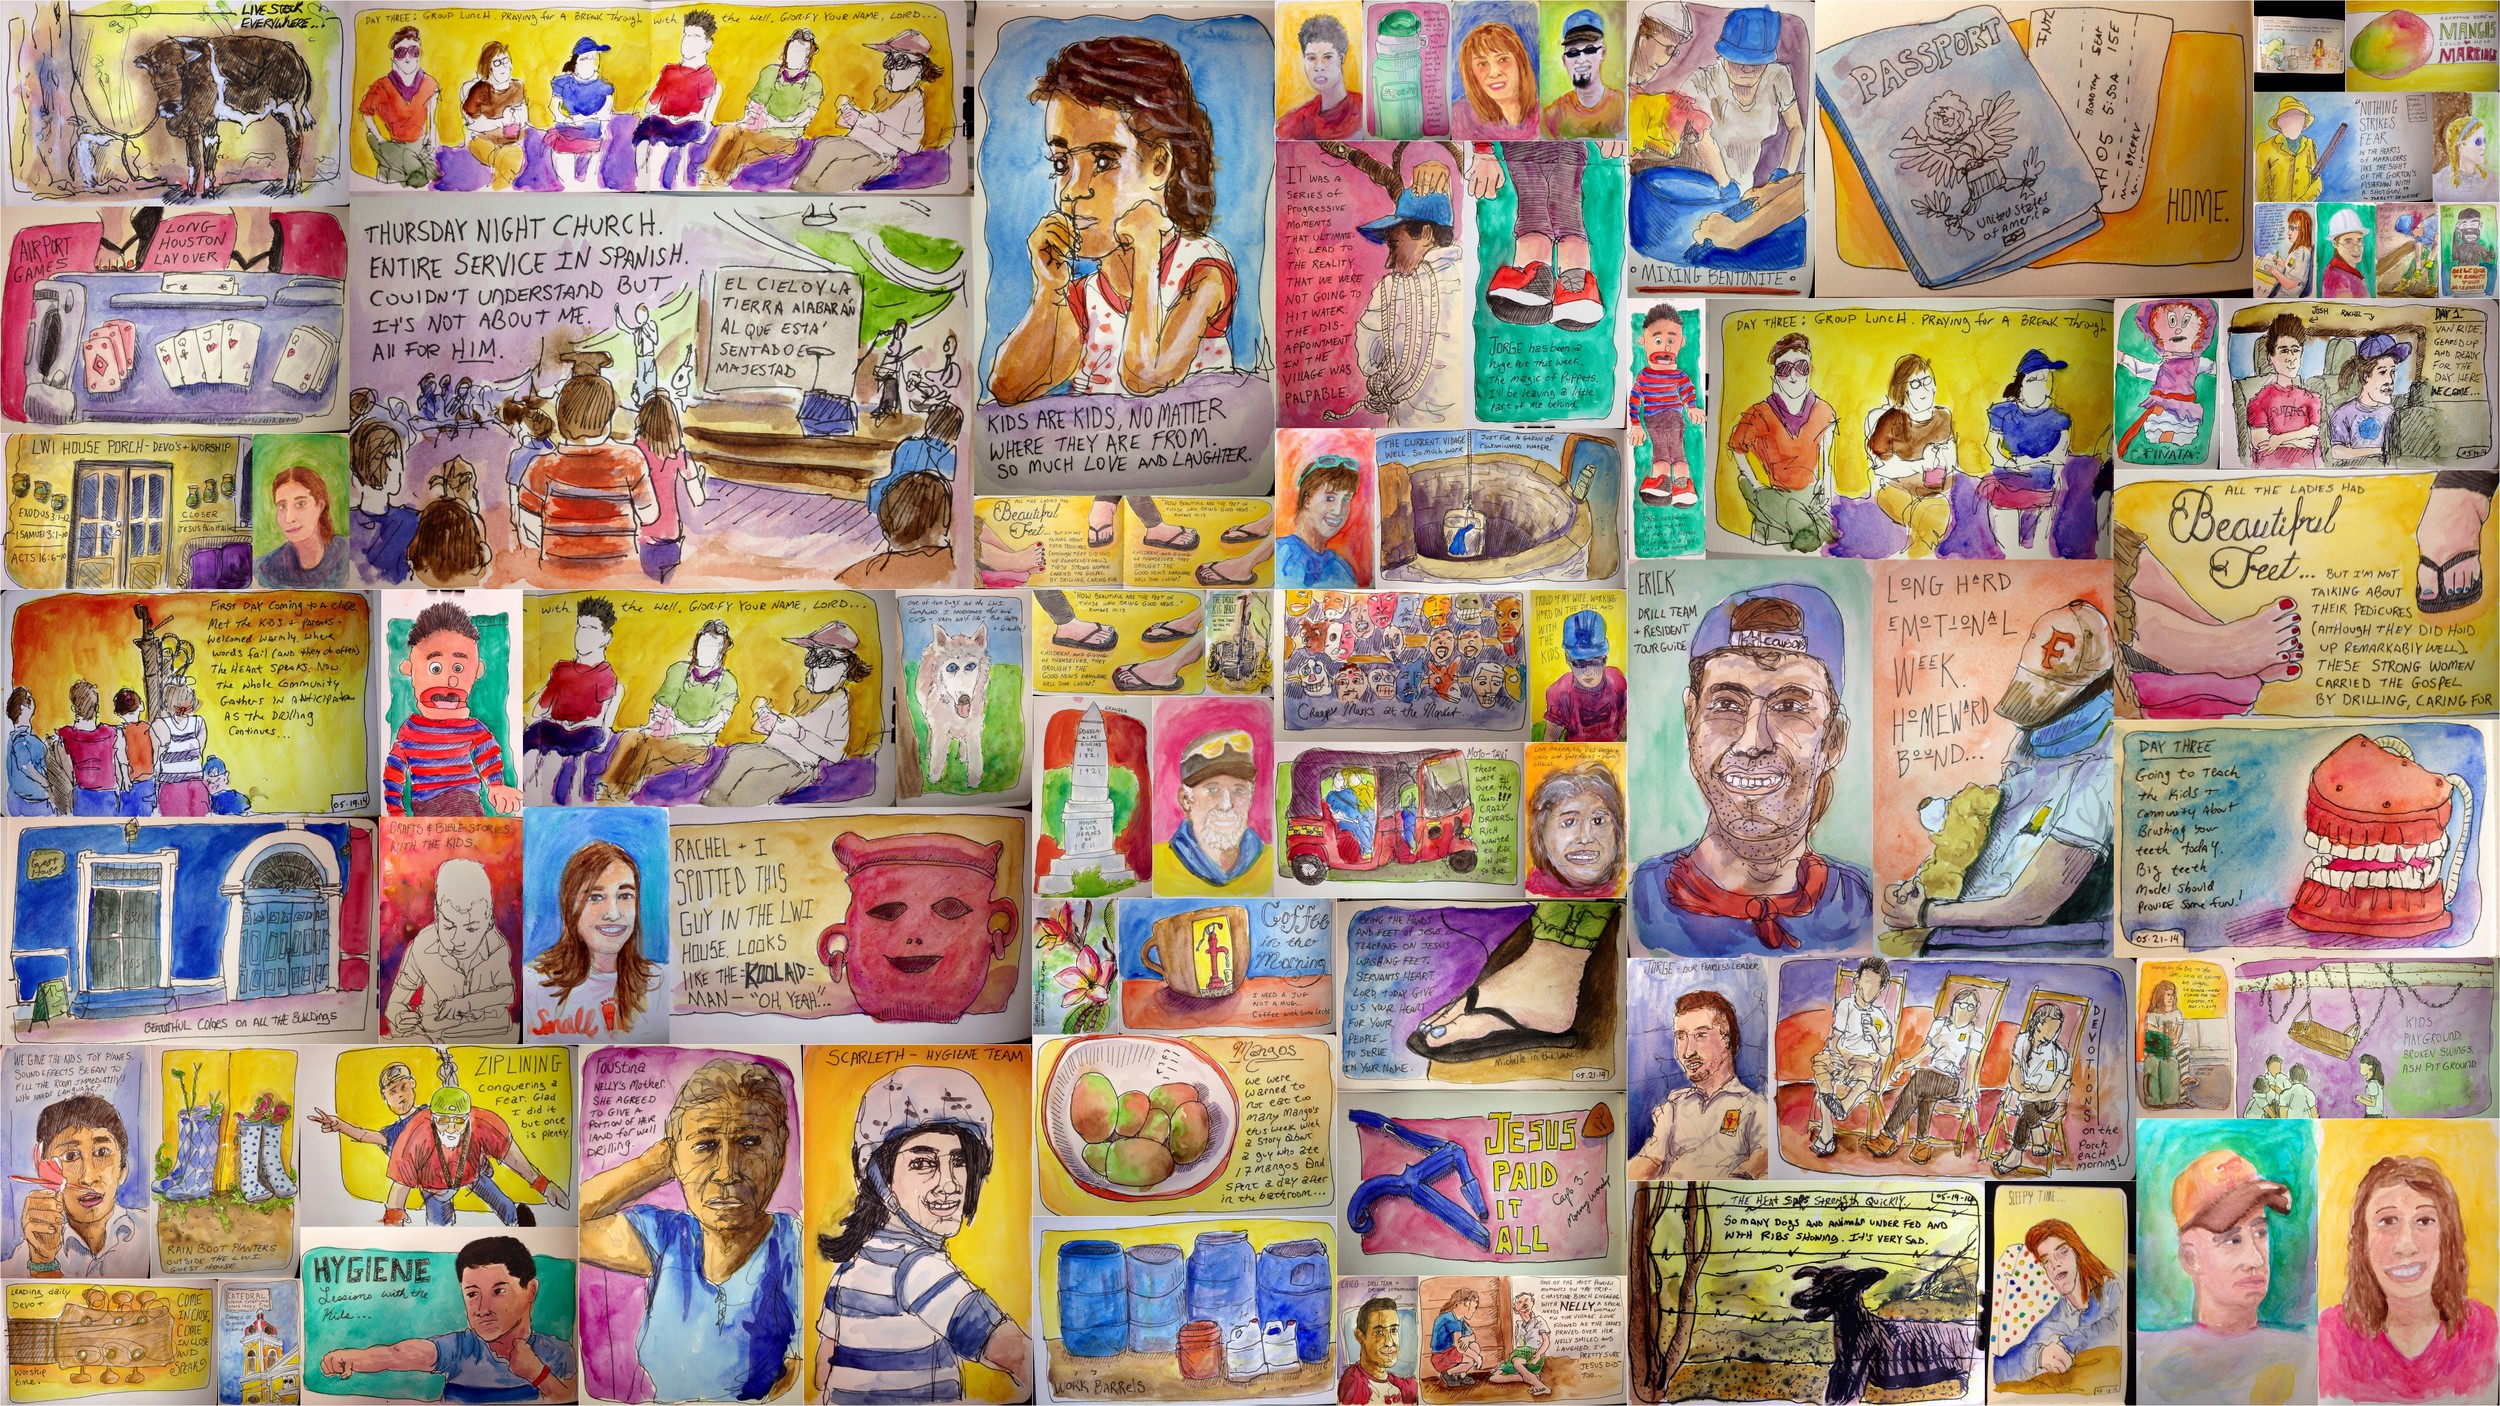 I had the privilege of spending a week in Nicaragua with a team of people from my church, working alongside an organization called Living Water International. Our goals were to drill a well to provide clean water for this village, and teach them about hygiene and the love of Jesus.
It was an intense week, both physically & emotionally. We had to move our drill rig and restart the process of drilling a few times, and ultimately it was determined that we would not hit water that week. There was no video of happy people experiencing clean water for the first time. There was no village celebration. It was incredibly difficult to process it all.
Our faith was stretched. We were faithful in all we could do, yet we did not arrive at our desired outcome. Thankfully, LWI is committed to continued efforts to bring clean water to this village. We wait in anticipation for the news.
Before I left for the trip, I had the idea of filling up a Moleskine sketchbook with the things I saw and experienced. While I had to finish things upon my return based on some photos I took - I'm so glad I decided to record these things to cement the experience all the more.
If you're interested in seeing all of the sketches check them out here!
Confession of Failed Art
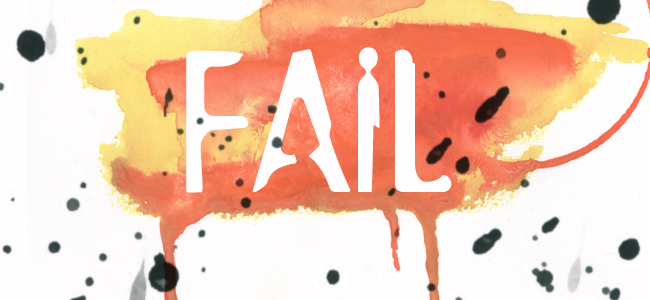 This past week I relearned a lesson in not ignoring the "small" stuff. You know, the stuff that you do all the time so you tend to not give it as much attention or care. I set out to do a watercolor painting based on an interesting photo I found on the internet. I took this to my weekly class, as I thought it would be good to have some guidance and support in rendering the extreme shadows (just in case).
My issue became that I just plain rushed the drawing part because I was so concerned about getting the extreme dark and shadows right. I didn't take the proper time to set myself up for success in this project. I rushed and was lazy with LOOKING at my source properly. As a result, when I started painting, things were just "off". No matter how hard I tried to "fix" areas, there was no turing back at this point. I could either commit to finish it as best I could, or scrap it and start over. I didn't have the motivation to start over, and although I wasn't pleased with my results, I pushed myself to finish. When I did, I was missing that satisfied feeling. I felt rather depressed and left myself open to those critical voices that are always looking for an opportunity to tell you that you aren't any good (and here was proof).
But instead of wallowing in my dissatisfaction, I determined to do as I have everyday in the past 10 months - to post it publicly as part of my year of daily drawings/paintings. I reminded myself that tomorrow was another day to create fresh. And I didn't allow myself to "throw the baby out with the bathwater". I asked myself questions: Why did it "fail"? What made it a lesser piece of art? How could I learn from this rather than just feel bad? Sometimes you need those experiences to learn and grow as much as the momentum of doing great work. I know you're wondering what painting I'm referring to, so to satisfy your curiosity look here.
How do you handle your moments of "failure" and dissatisfaction with your creations? Maybe there's a learning opportunity there for you too.
Scribbling Star Wars
 I've been experimenting with a scribble style lately, with Star Wars as my subject matter. This experiment is forcing (sorry for the pun) to keep things fast & loose. It seems the more "successful" ones are where I push myself to just keep moving. Scribble more. Stop & adjust less. My line is a continuous line drawing (you don't pick the pen up from the page at all) using various black inks. Most of the color is watercolor paint, watercolor crayons or pencils. Some spots are non-diluted by water. Every so often I hit a spot with a dark blue china marker. And then I add some white gouache and black watercolor paint. This helps to keep things from breaking down completely, keeping to some highlight & shadow values. It helps give the subjects some form.


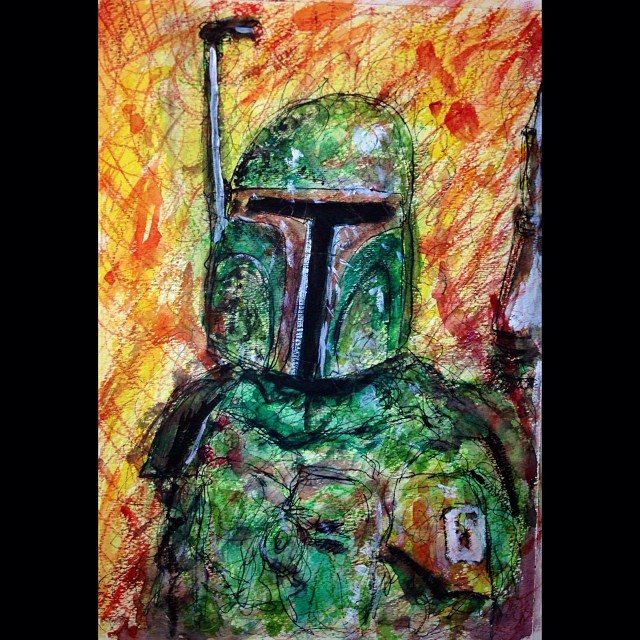

To be honest, the first one (Yoda) was the hardest. I wasn't feeling loose. I kept worrying about if things looked "right". It's hard to keep yourself moving. That perfectionist voice doesn't like that. So this is another way to beat him. Keep it fast & loose.
Today I did my Skywalker scribble. I chose this scene, rather than a straight up portrait, because this is my favorite scene from Star Wars: A New Hope. Luke's world has been rocked. His aunt & uncle are dead. He's at a crossroads. He must decide to stay behind and try to pick up the pieces or move ahead into an unknown (and potentially) dangerous adventure. This scene always speaks to me of hope, longing and a sense of destiny. Powerful themes in my own life.
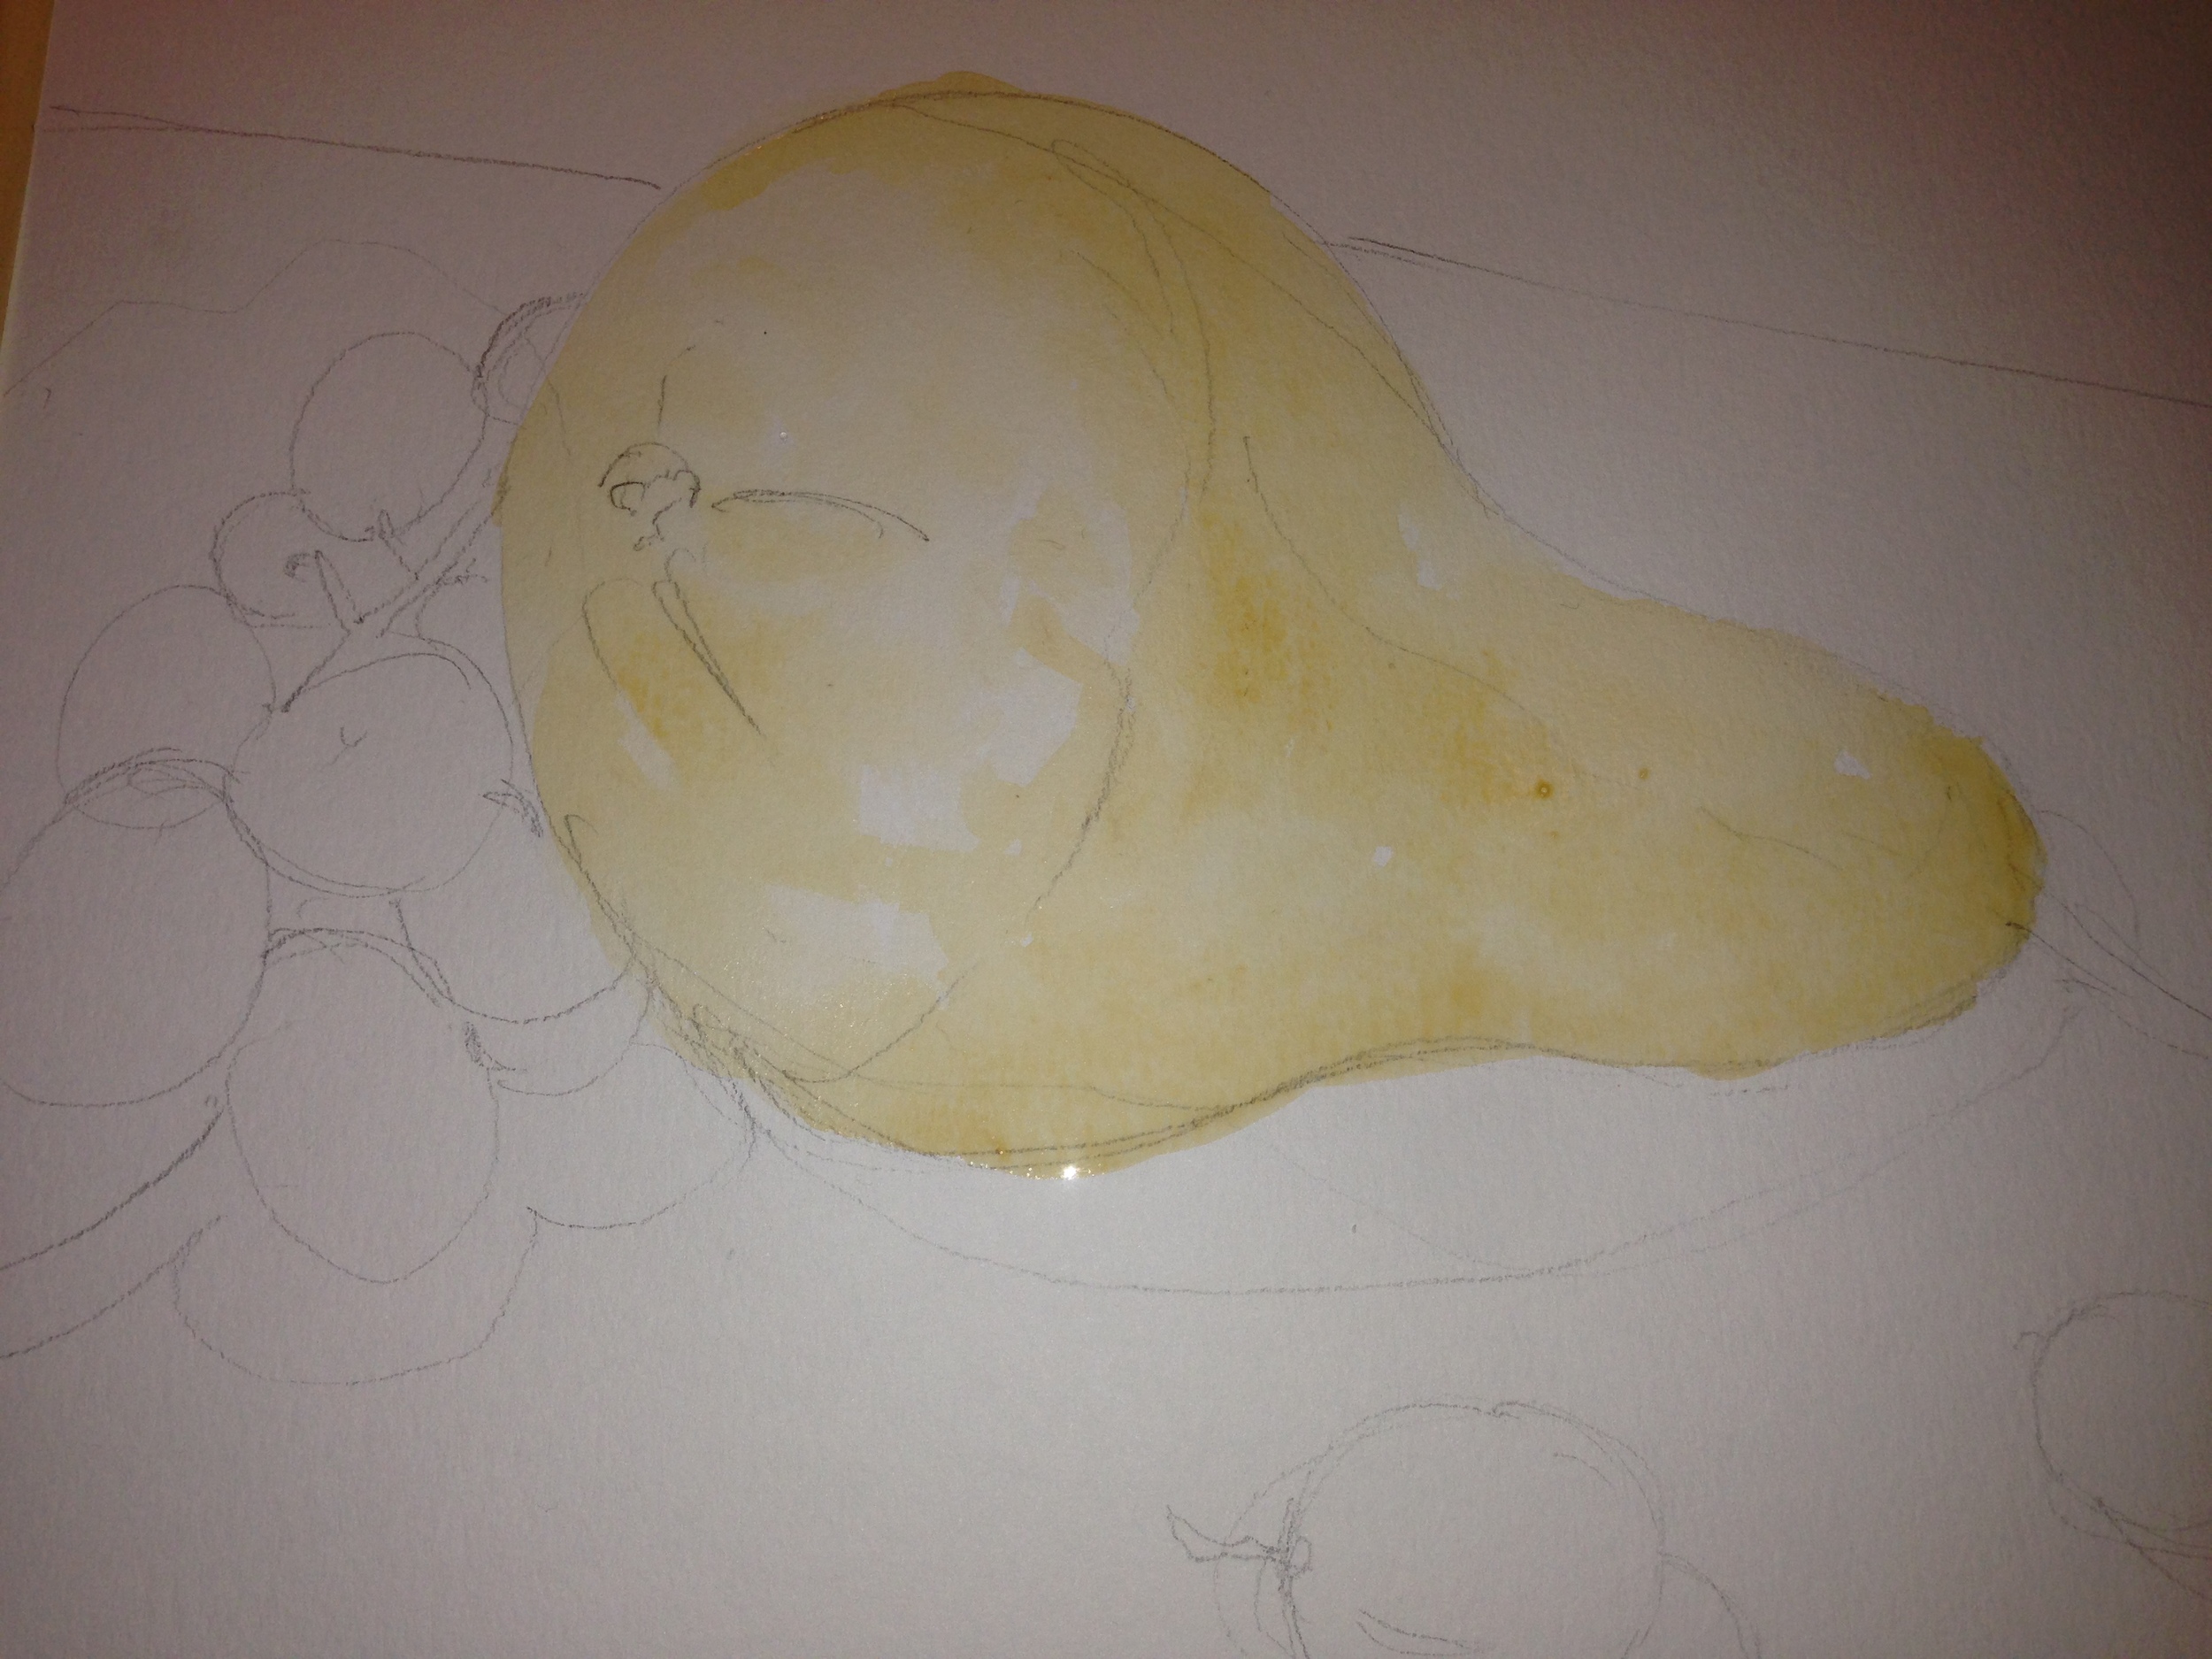
Art Process: A Pear of Grapes
Did you ever look at a piece of art and wonder how it got to the finished piece before you? It's a rare thing to see art as it goes through it's various stages. Well, today I'm going to let you in on my process for this watercolor still life I've called "A Pear of Grapes". First, I set up some fruit and lighting (for some drama) to my liking. I knew I wanted a few different areas to avoid everything all clumped in the same place.

Next, I taped down a piece of Watercolor paper (Strathmore 140 lb) to a foam board. I'm using Winsor & Newton brushes and watercolor paints at the moment. Also pictured in a kneaded eraser, an HB Graphite pencil and two plastic jars for water.

I started off with a simple pencil sketch to block out my composition.

Starting with the lightest color, I lay down some wash of watercolor paint.
From there, I move on to add more color and a bit of texture, still keeping things light.
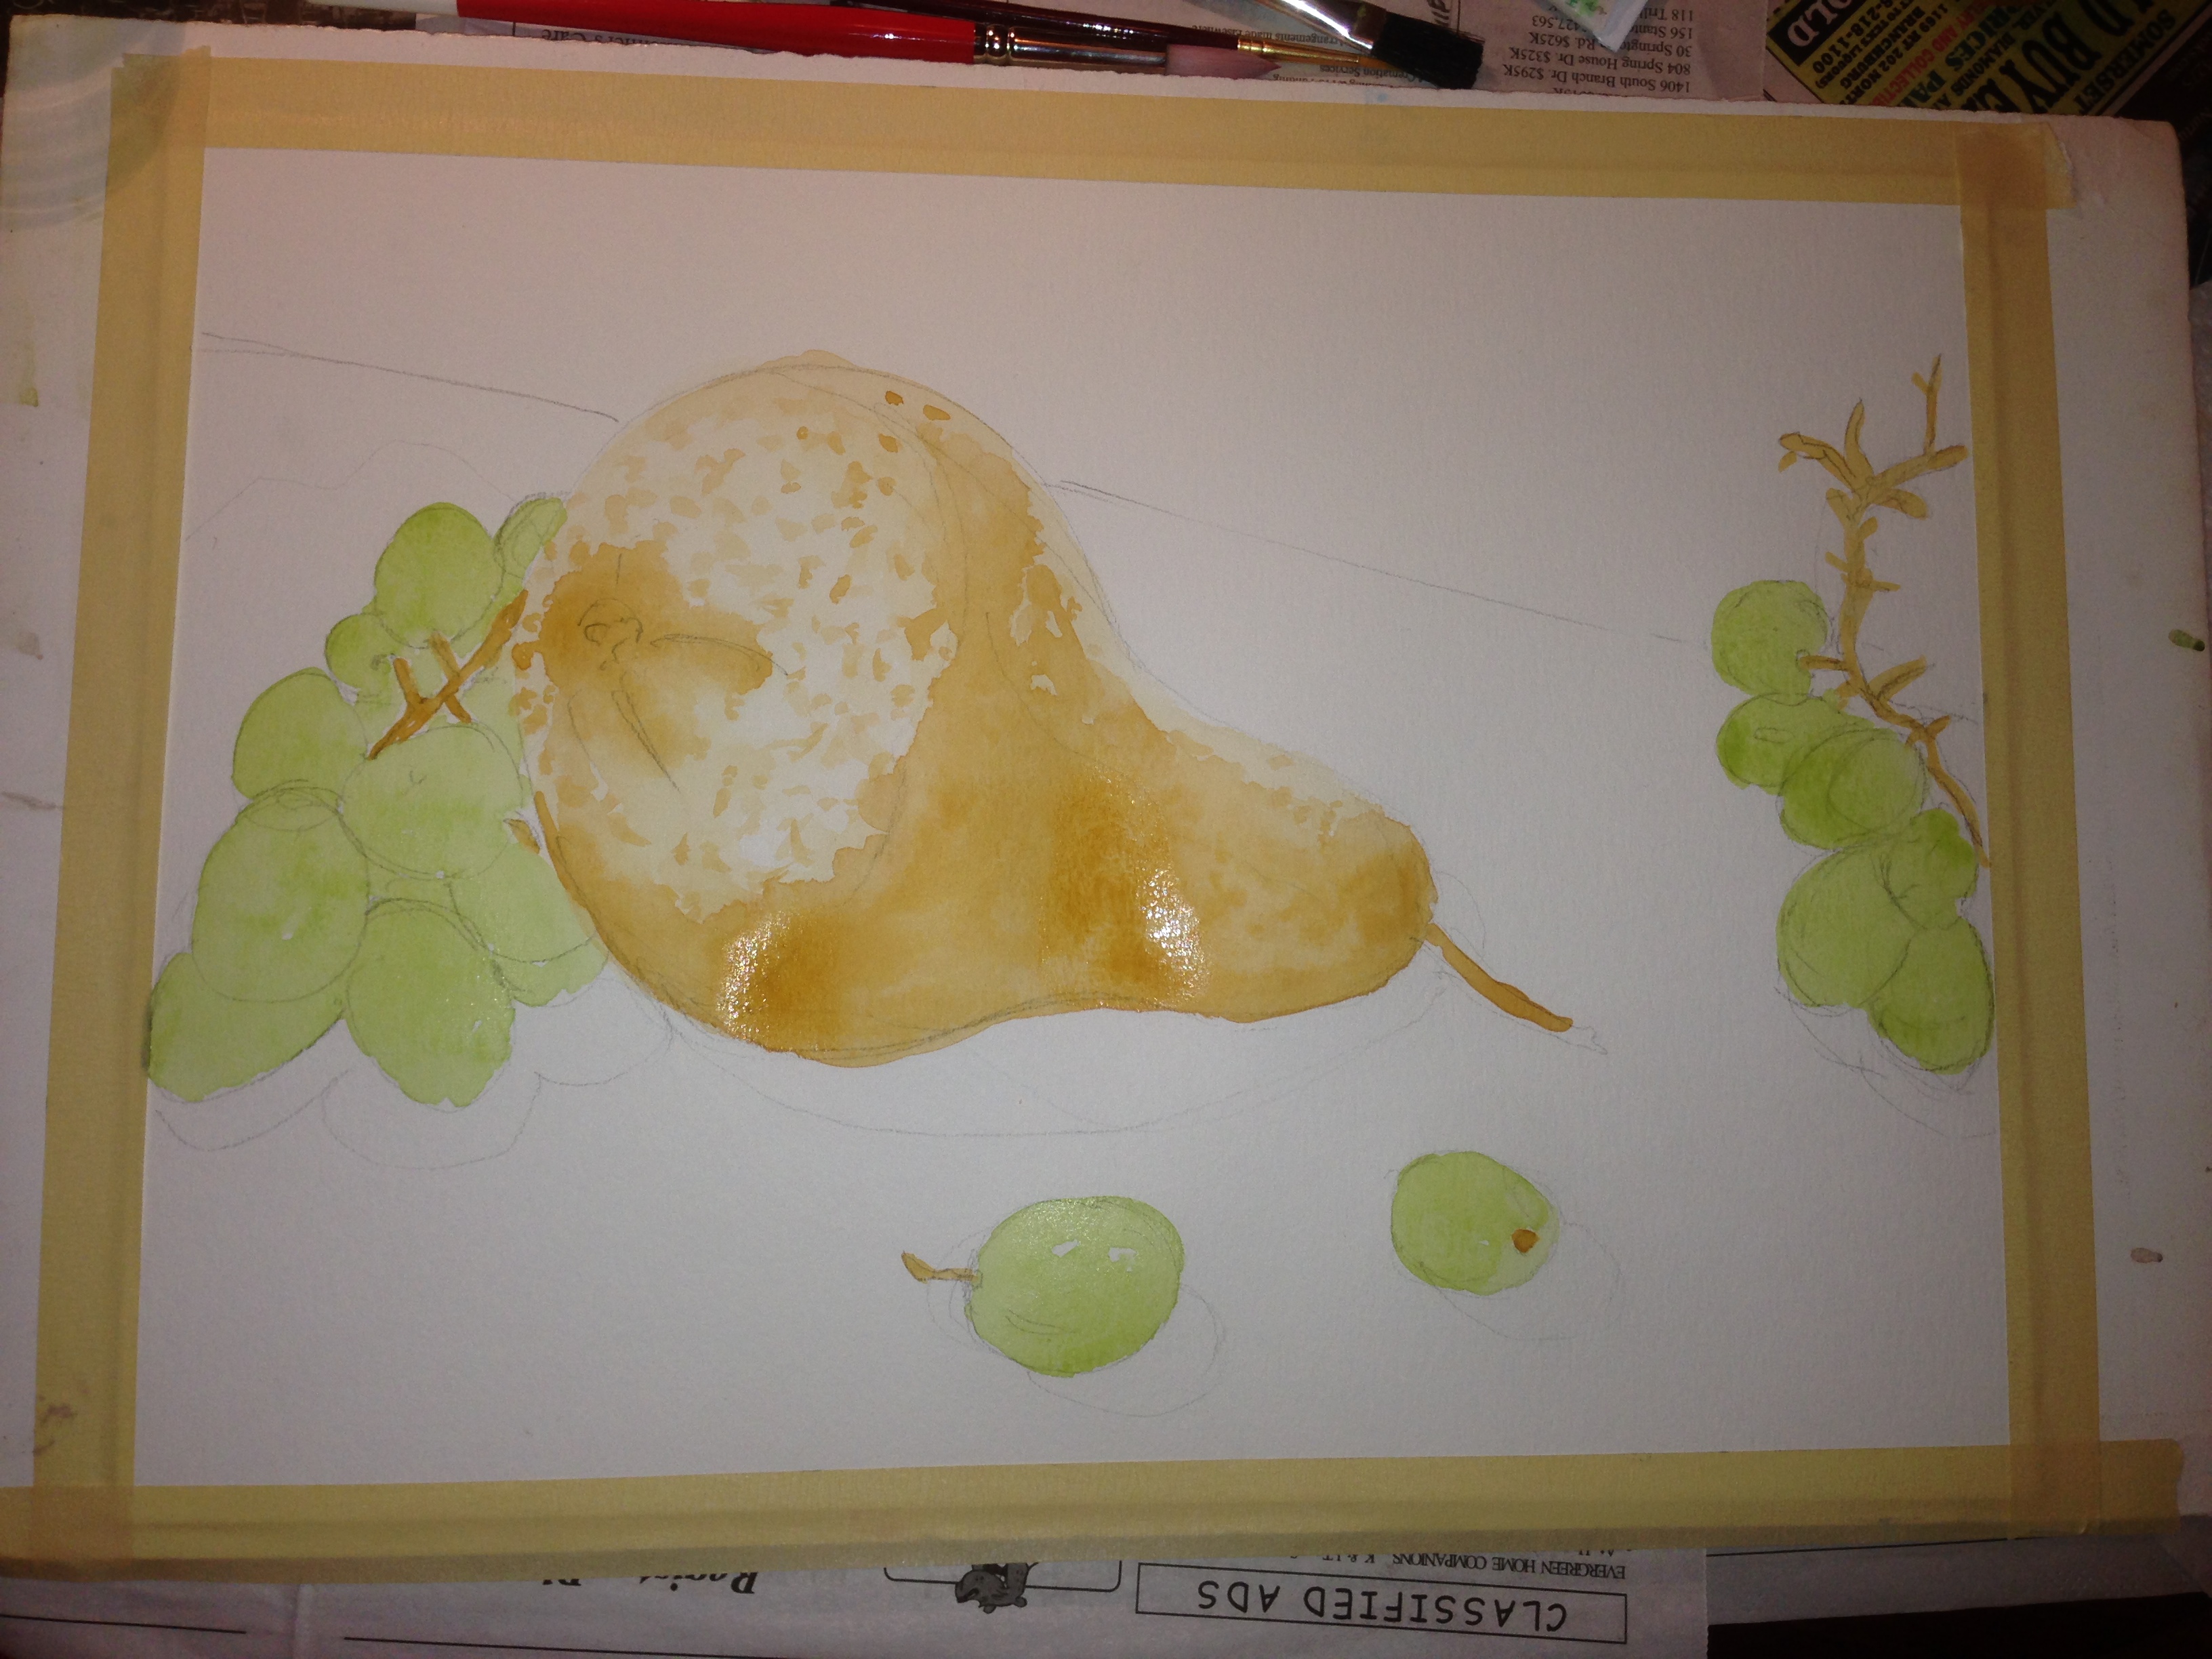
I keep layering to get things a bit darker, while still keeping some light areas.

I work the main subject until I feel like I'm at a good place to switch things up (or waiting for an area to dry before working a bit more).

Now, I lay down some color to the foreground, knowing that I'm going to add more texture so I'm not concerned with getting my watercolor smooth.

I do the same for the background, as well as now going back into my dry areas on the fruit to add more texture and lines. I've also added some darker shadows at this point

Now I apply the texture in the foreground area using a darker hue and more pigment of the watercolor paint.

Then I add a little more texture to the background and foreground. And to put some finishing touches, I use a bit of white Gouache for some highlights.

And there ya have it folks. Hope you enjoyed a little peek into my process!
How This Moth Took Flight: My Artist Process
A couple of weeks ago I announced the winner of my contest. Jeannie Pauly (@rovingsprout on Instagram) was the lucky winner with her submission of her huge moth photo. A perfect Autumn subject (and yes, kinda creepy). The original art will be en route to her this week!
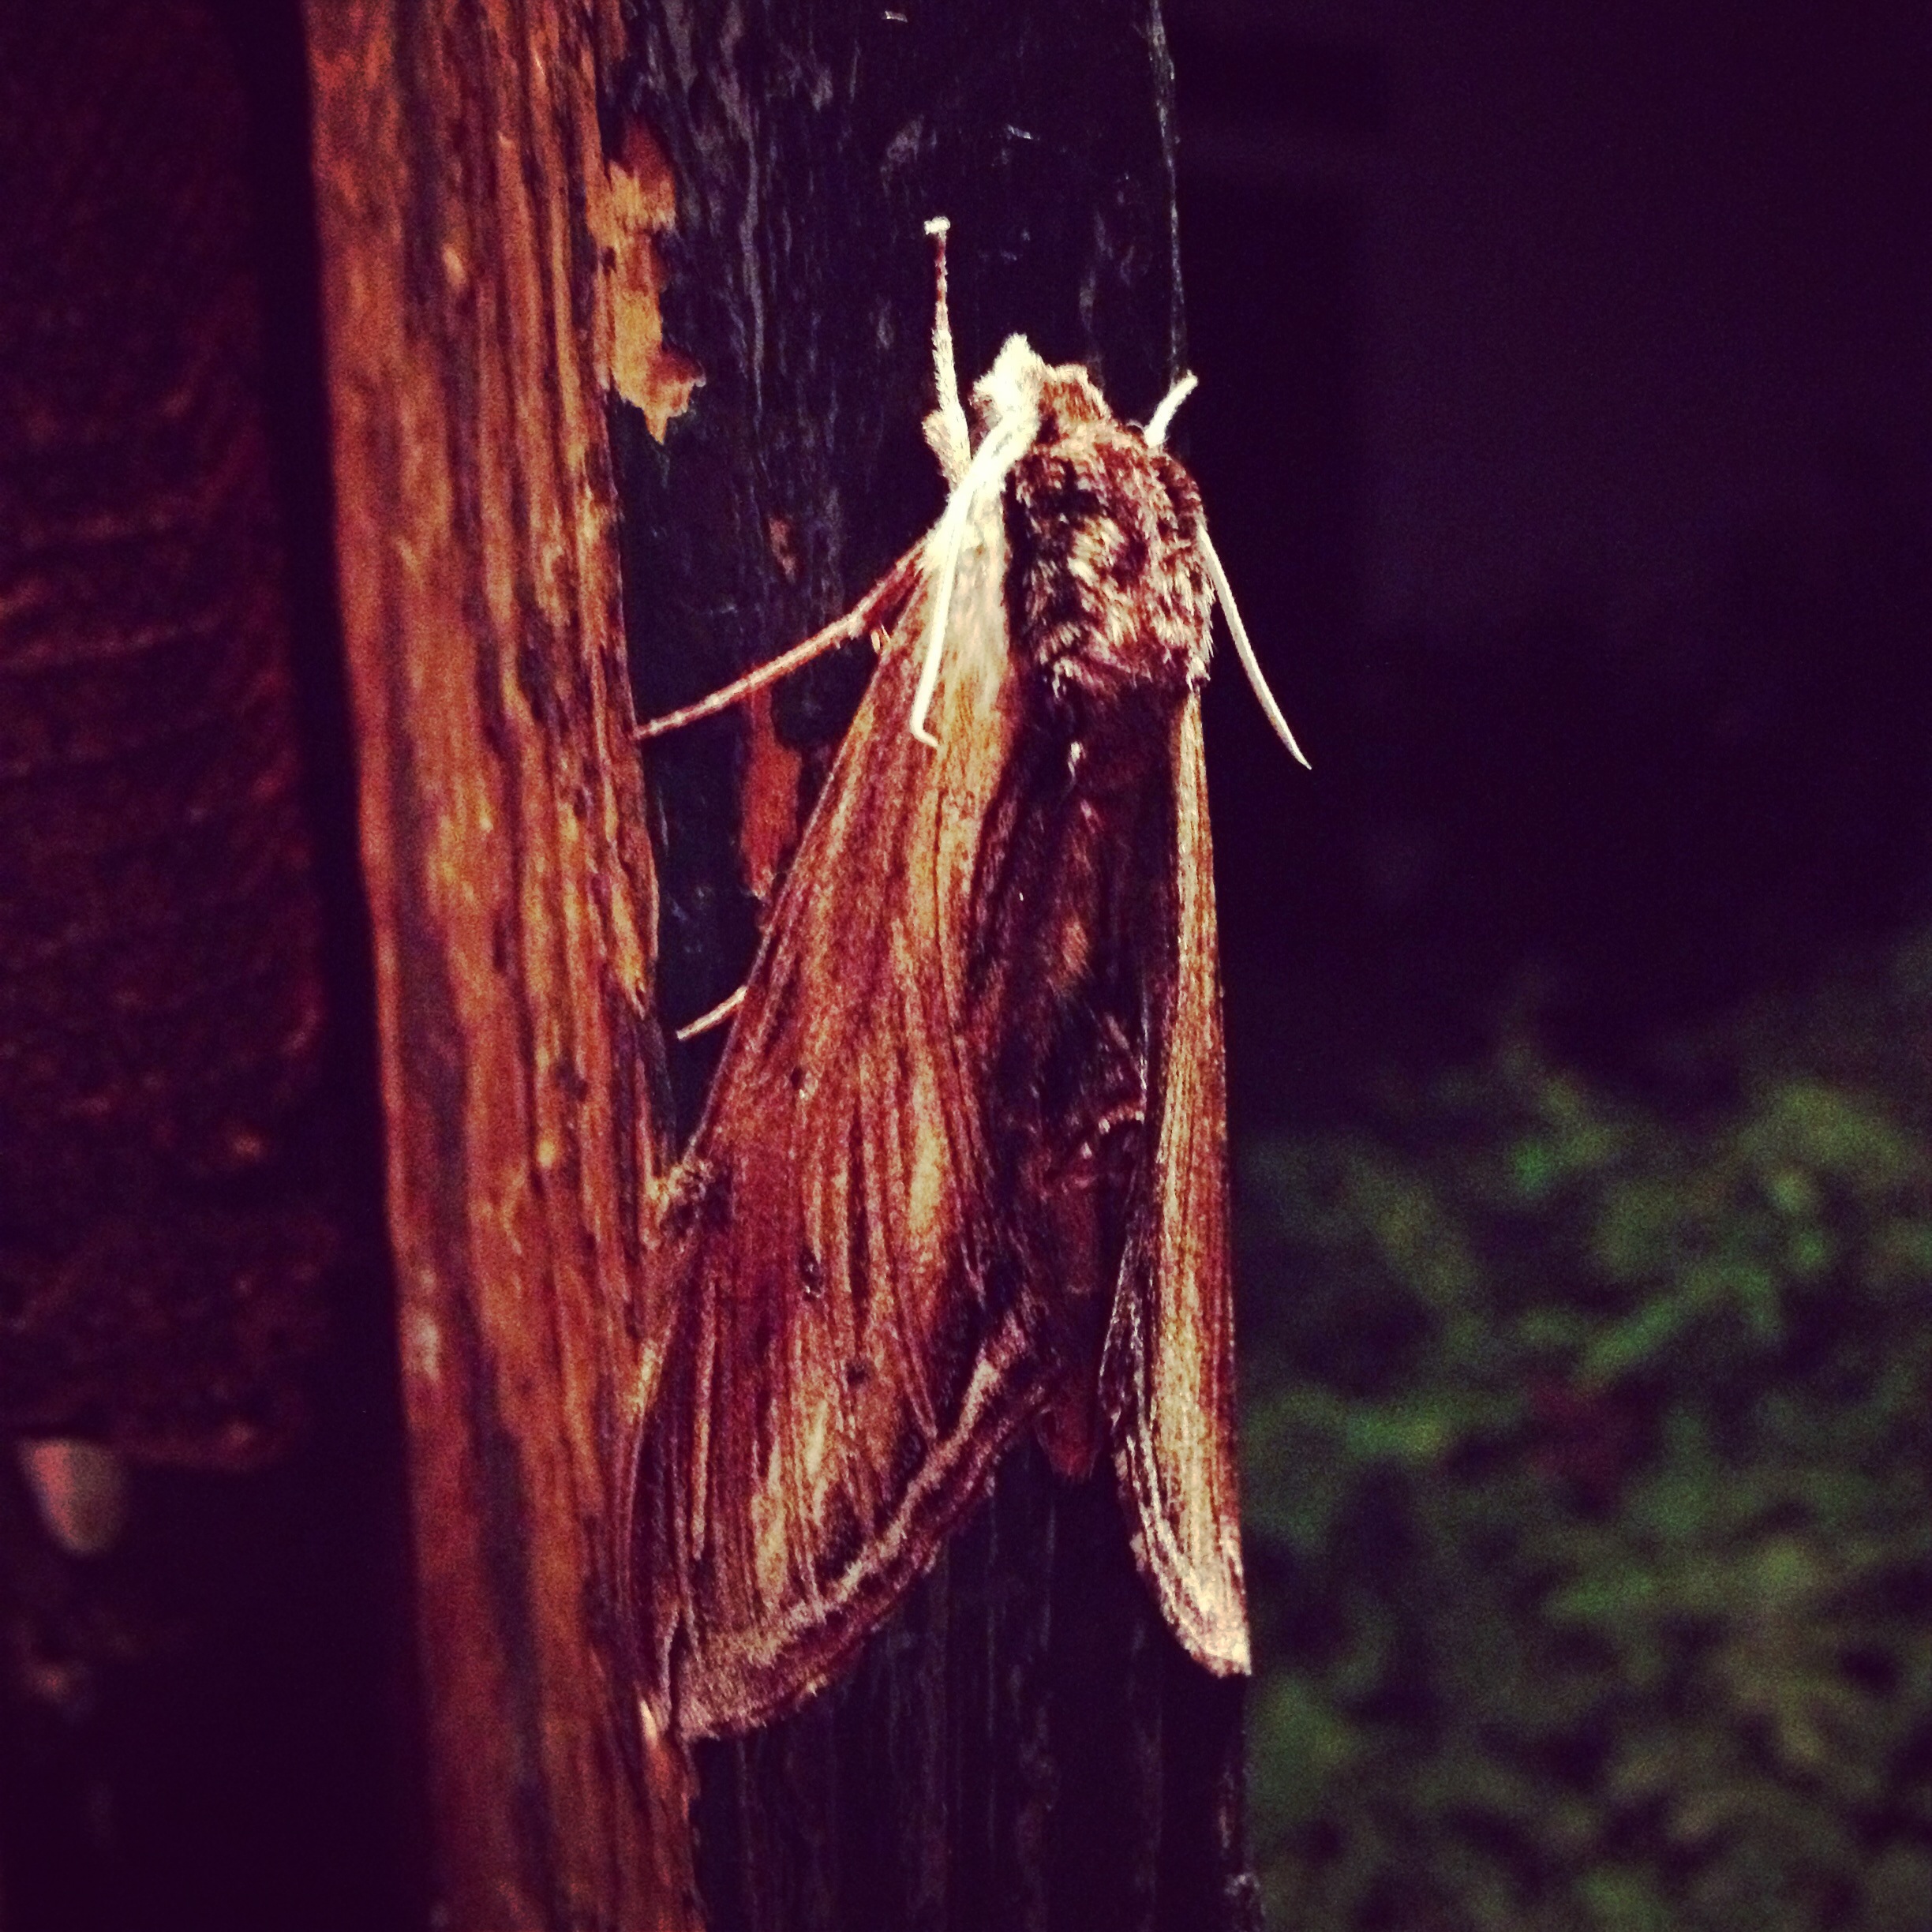
I figured I'd take this opportunity to not only show the final illustration that Jeannie will be receiving but also show a bit of my process. I know that as an artist I love to see other artist's process. So here we go:
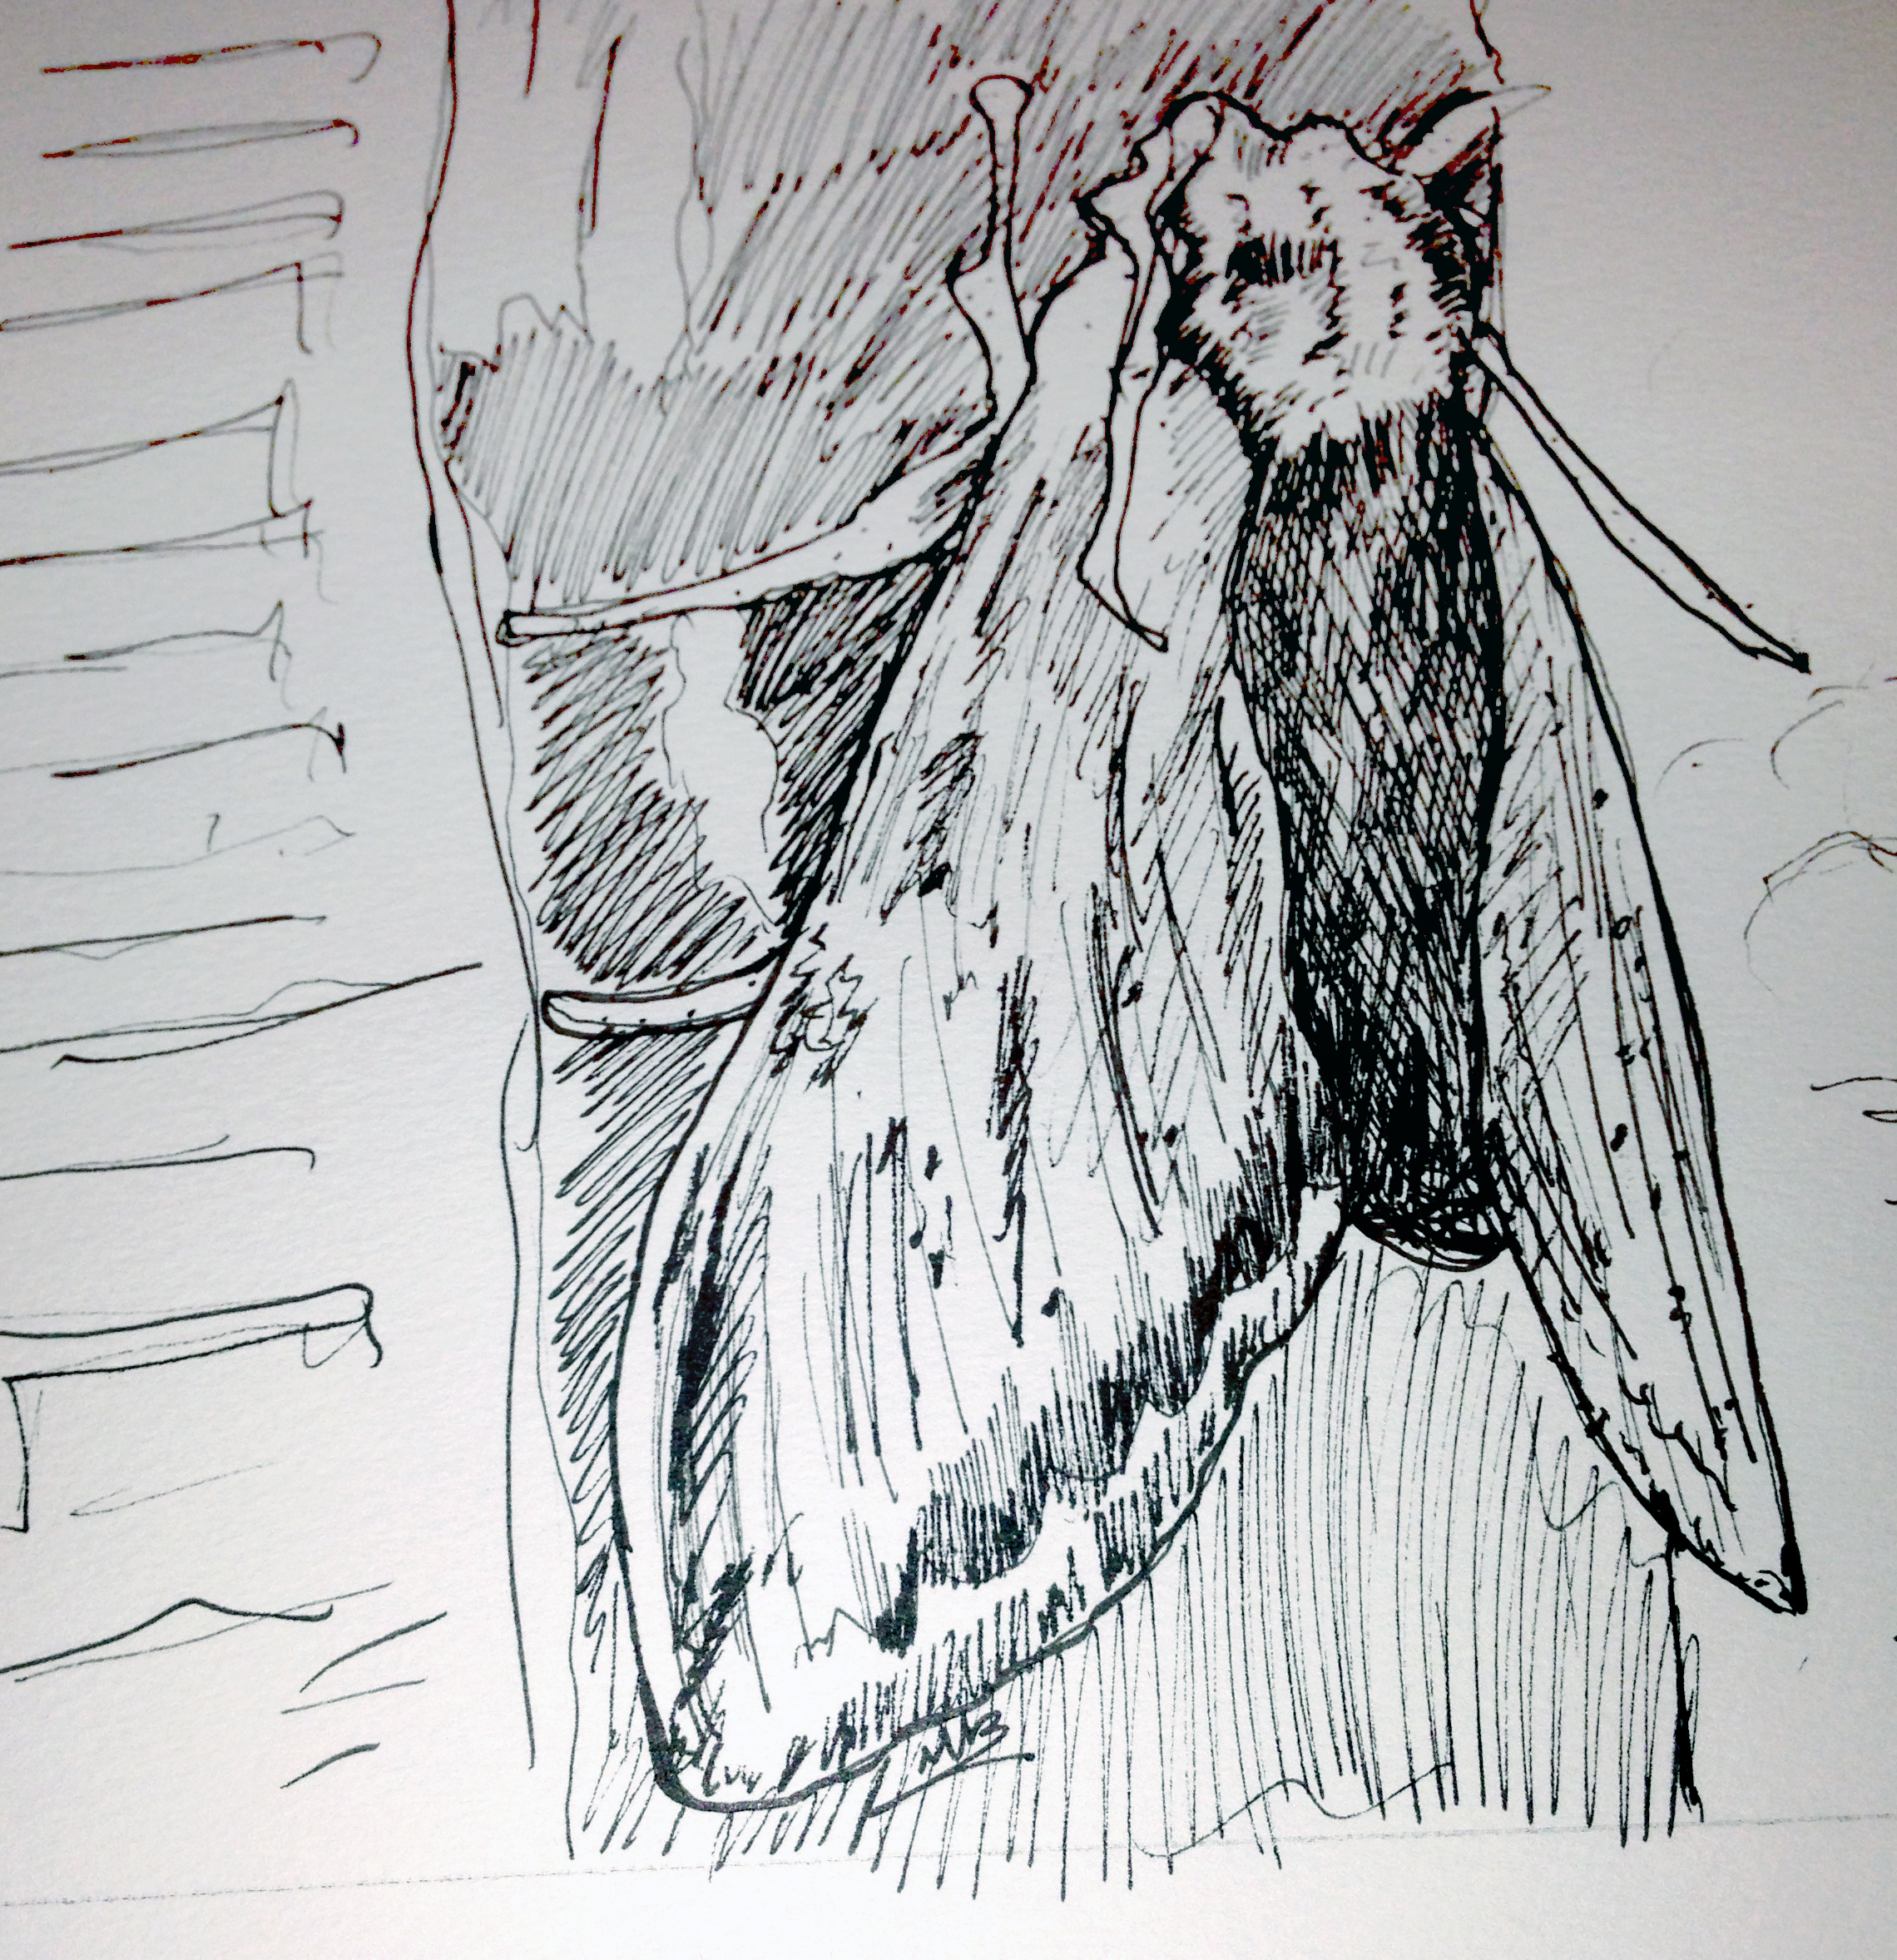
First, I go right to drawing out the moth and surrounding pole / background with my Staedler pens (black waterproof ink - 4 pen set sizes .1 .3 .5 .7). I start with a .3 in size and work my way up to a .7 where I want to add a little thicker lines and darker areas. I used to start with pencil, but found that I erased too much & was too noncommittal in my line. I switched it up after reading a book challenging me to go right for pen, as it helps you with more confident line. And it forces you to work with the line you've made, rather than to get stuck in constantly erasing & redrawing, never moving on to the rest of the process.
Then I lay down some watercolors - starting with lighter colors and hues. A little wash here and there. A happy little moth. For brushes, I primarily use water brushes like these. But on this one I also used a few watercolor brushes I have kicking around. Nothing special.
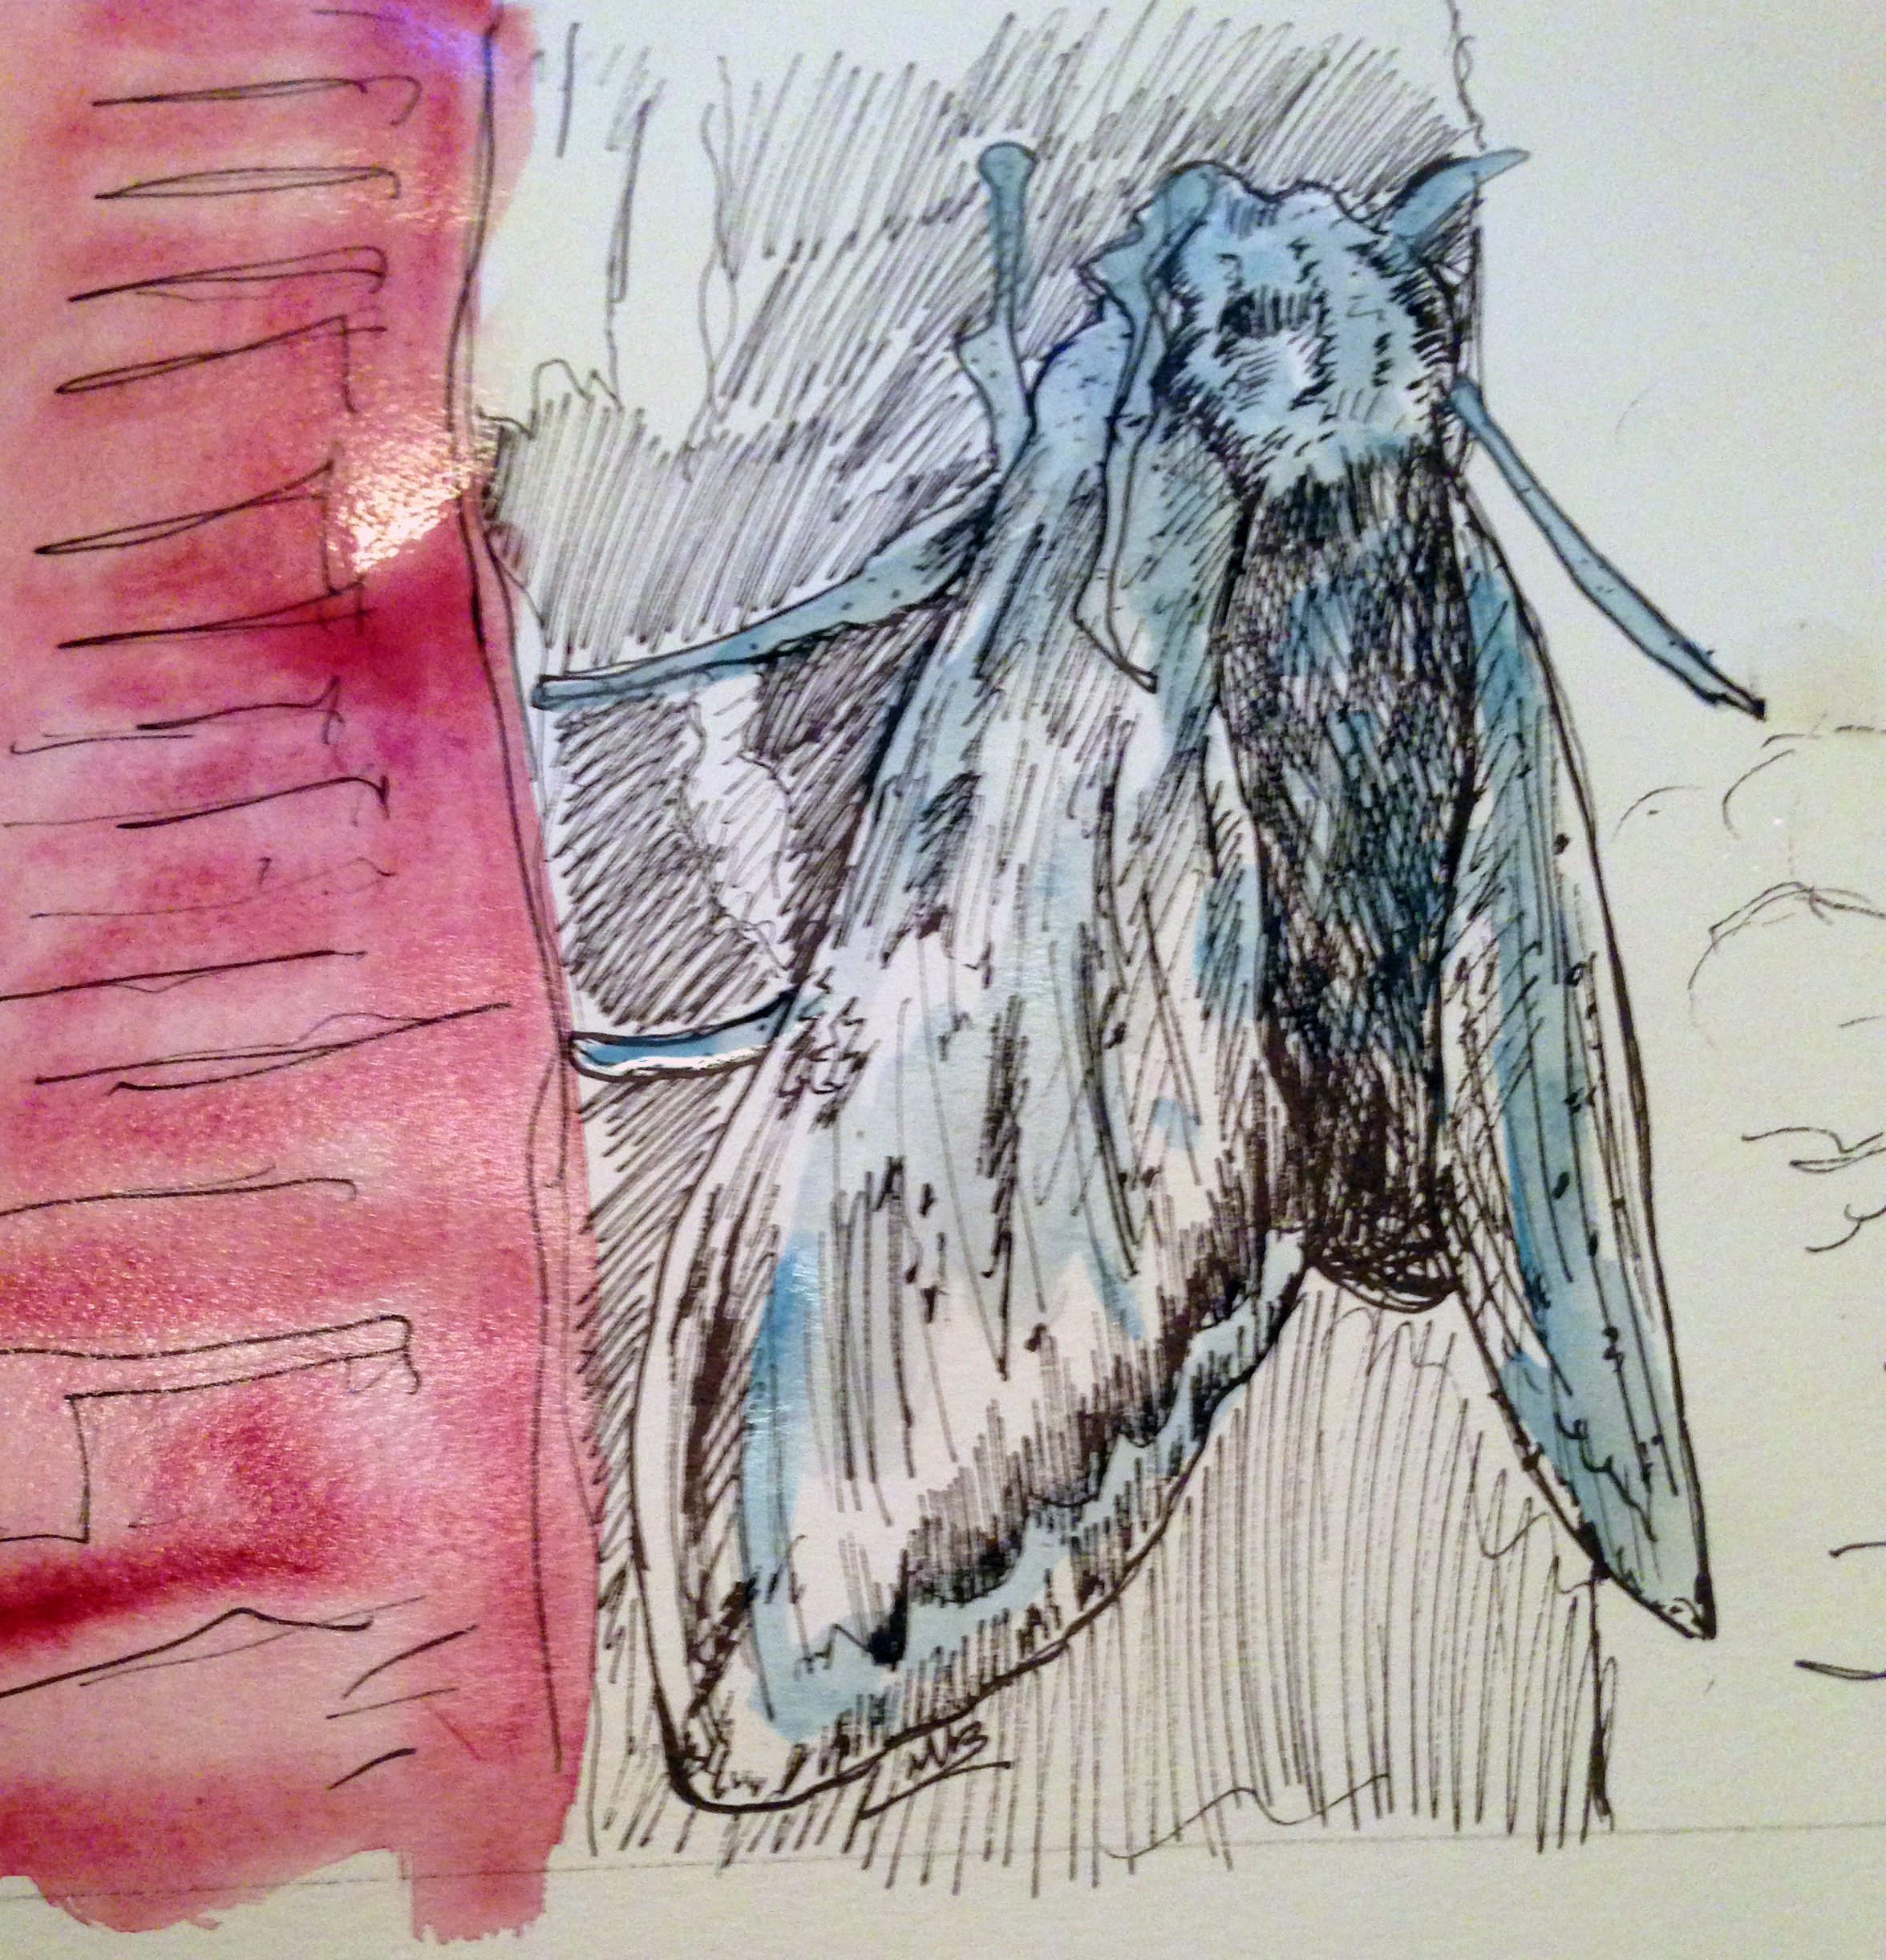
I build that up getting darker and darker, defining more of the shadows. I have several sets of watercolors I use. It usually is more about selecting the right colors than sticking with a certain brand. I used a few different pan sets for this one. I tend to like colors that pop, and didn't want to keep the brown and almost monotone feel of the original photo.

Then once the watercolors are dry, I'll go back in to a few spots to hit with a darker black Take-sumi ink (that isn't waterproof). I use my TWSBI pen for this finishing touches stage. And, voilà...
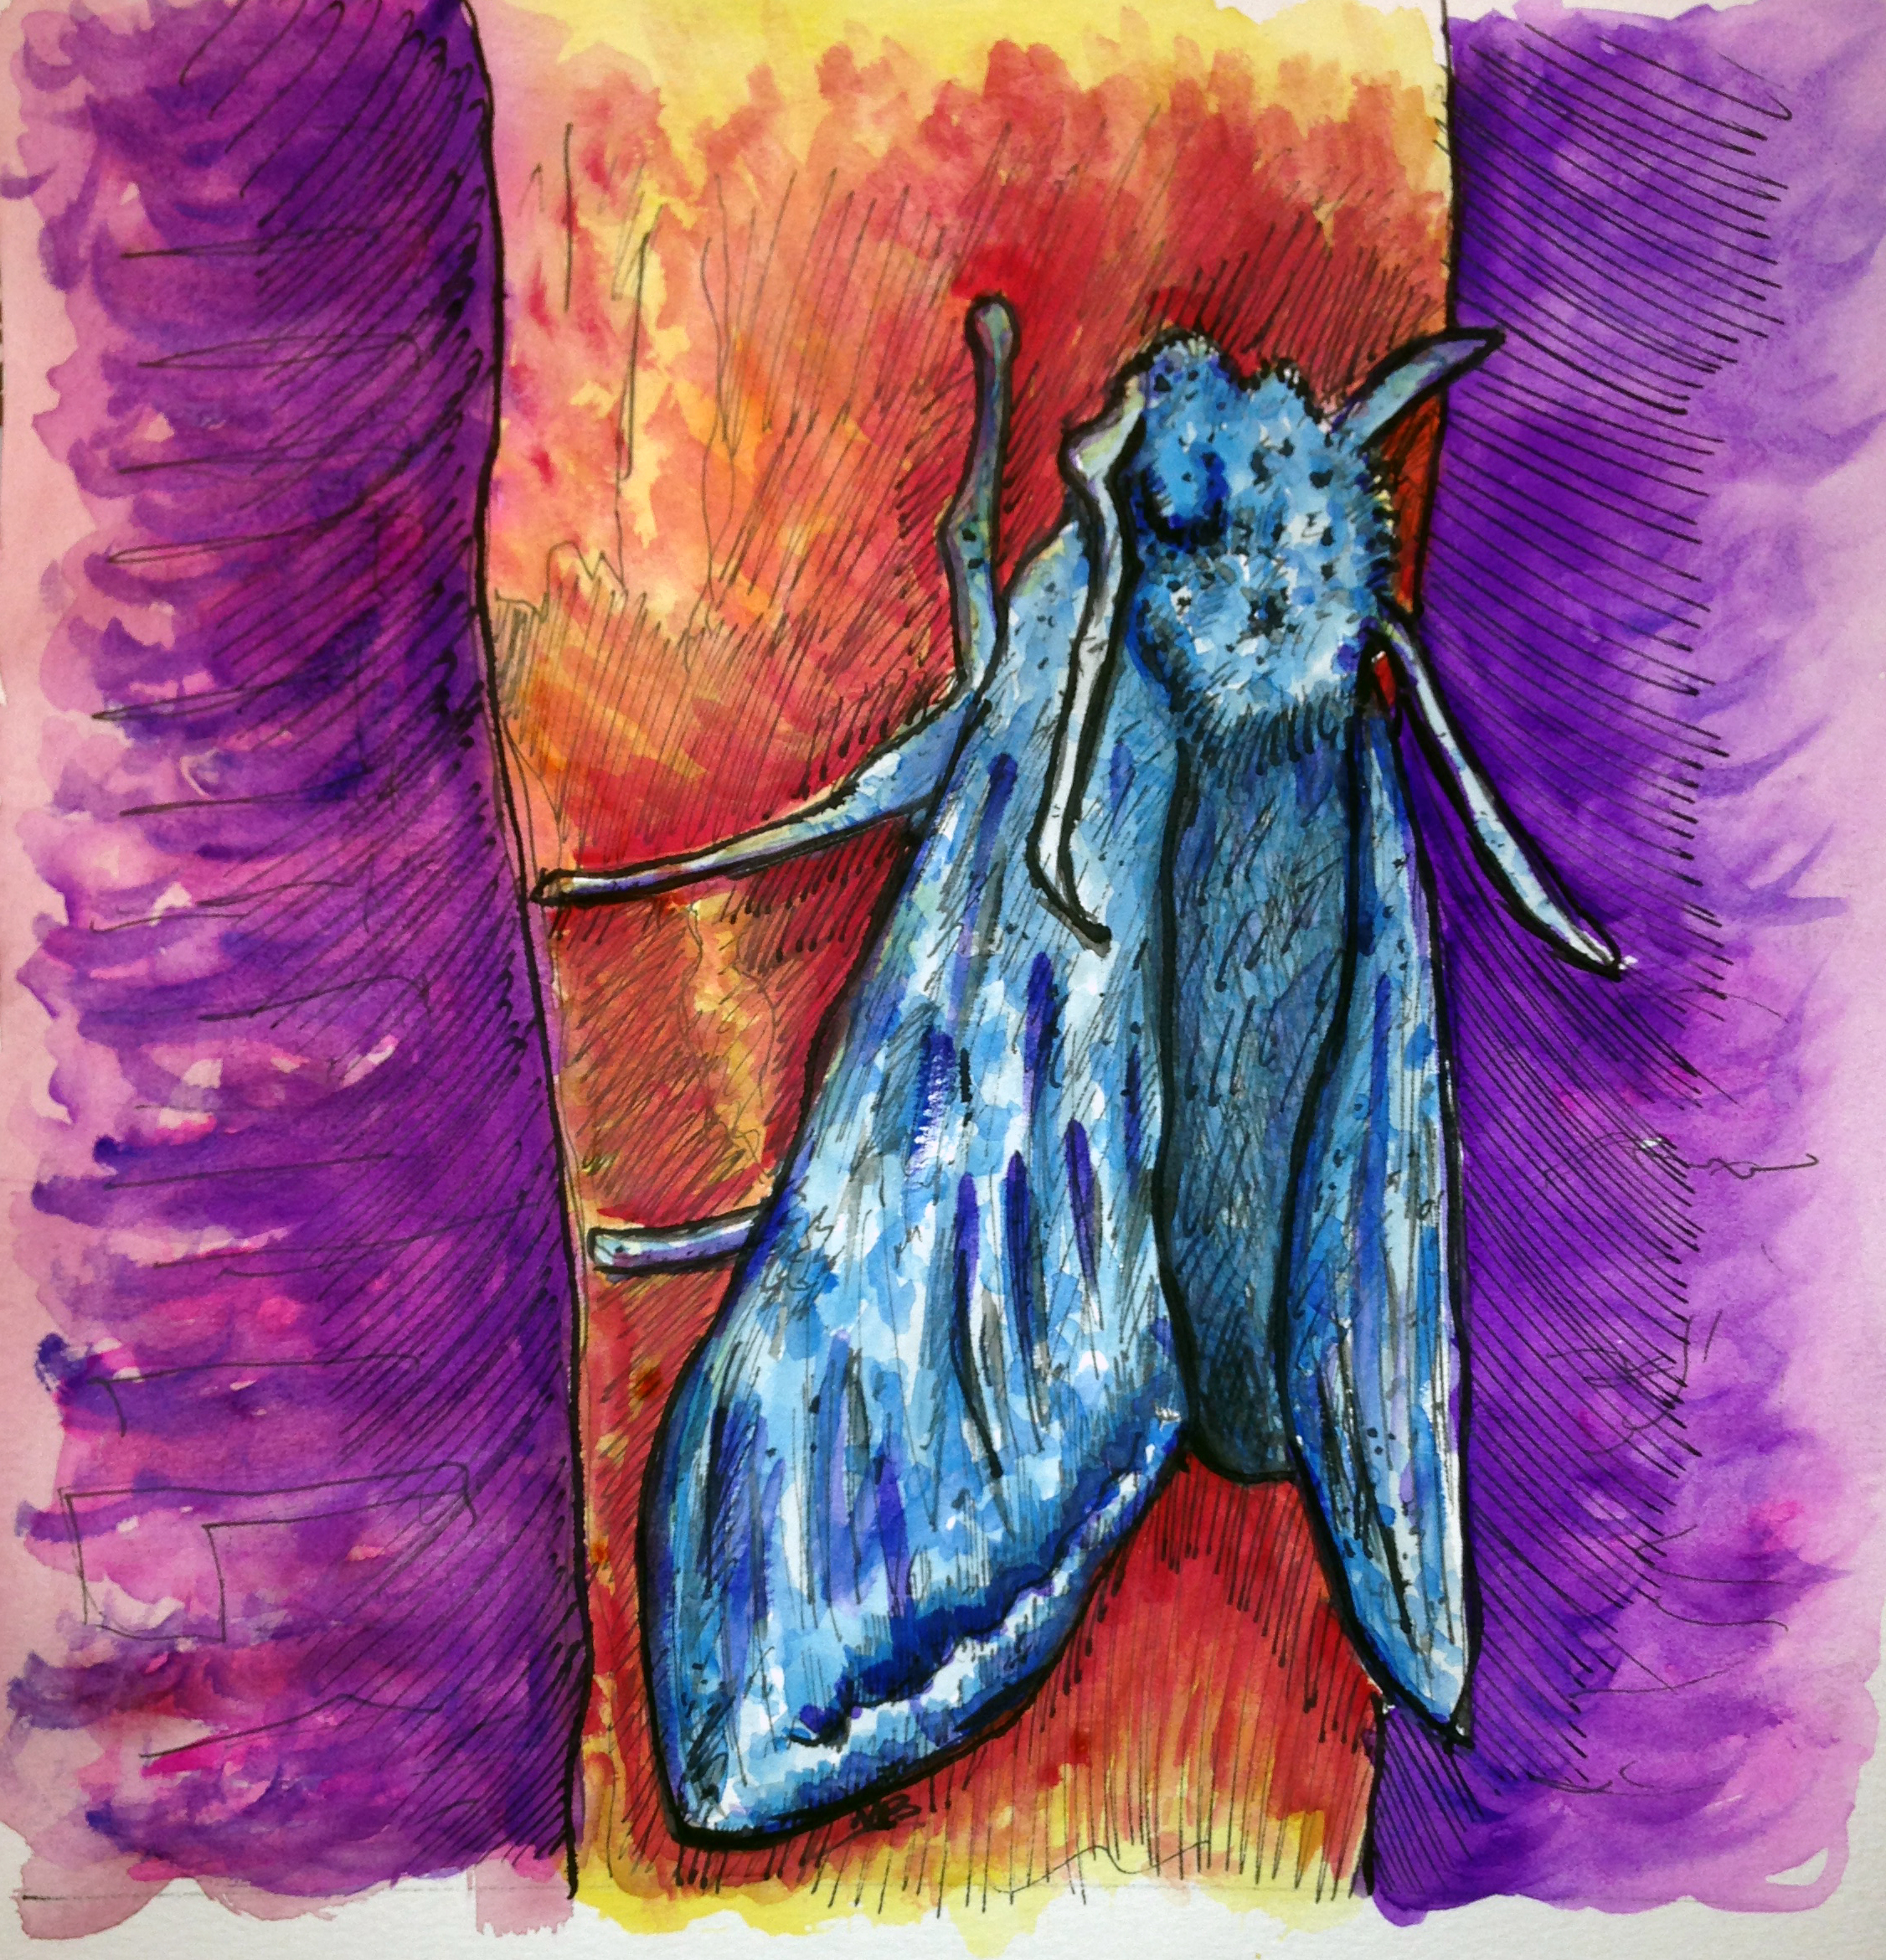
And there you have it folks. Here's the original and the final art! I give you "Moth-er, May I?"

Something's Sketchy
 If you've been following me for any length of time, you know that I've recently renewed my love for drawing. I've been filling up art journals like crazy and posting my sketches on the web. Part of the challenge is to keep finding interesting subjects to draw, whether from real life or photo reference. That's where you come in...
I want to invite you to be a part of the process. Are you ready?
Here's your chance to pitch something for me to sketch. Between today and September 15th, 2013, I will be accepting photos from you - things you want me to sketch. After all the submissions are in, I will randomly pick a winner and sketch their subject matter. When I finish, I will post it here and on Twitter/Instagram and then will mail the lucky winner the original artwork!
Are you in?
A few rules:
** Open to US only. I'm paying the shipping charges :) 1. You MUST enter a comment below introducing yourself - your name, where you are from, a twitter name / website and why you want to be the lucky winner. 2. Email me (MBsketchme at gmail dot com) ONE image only (must be your own image - no googling images or stealing from others). 3. Image specs: must be a high resolution and clear image. I need to be able to see details! 4. Image content: NO Explicit images! // No landscapes or crowds // Iconic images work best (IE - an object or person, part(s) of a person, animal, plant. machine, etc) Look at my sketches to see the types of things I've done. 5. The final artwork will be my artistic interpretation (I may exercise "artists rights" to crop or colorize, etc.). Ink & Watercolor medium. Final dimensions TBD but will be no bigger than 8.5 x 11. 6. There is nothing legally binding about any of this. It's just pure fun! You must abide by all rules to have a valid entry! Good Luck!Creative Tools
 I love hearing about new tools to use in my creative endeavors. Perhaps you're the same. Sometimes using a new tool can open up a world of new creative expression. A few people were asking me about what I use to create those illustrations in my art journal. While this is by no means a complete set, the following are some of the tools i'm messing around with currently.
What's in my new creative bag:
1. A set of color Pilot V Razor Points.
2. A no-name pan watercolor set I've had for years (large white one shown) and a Peacock watercolor set that was my sisters from the 80's. (Made by Binney & Smith, turns out to be "vintage")
3. A new Winsor & Newton Cotman pan watercolor travel kit.
4. Giant binder clips to help with holding wet pages down.
5. A set of Staedtler liner pens (0.1 mm, 0.3mm, 0.5mm and 0.7mm).
6. Two Moleskine Classic sketchbooks larger & smaller (these are from old days. Not really liking the Moleskine reissues though).
7. A black Sharpie. (always helpful)
8. A cheapo no-name brush.
9. Three waterbrushes - two Niji Large Waterbrush and one Sakura Small Waterbrush
10. Kamset pocket pan watercolor set (no link available)
11. Recollections watercolor pencils (bought from Michael's)
12. Canvas carry case for pencils & misc.
13. Pencil sharpener.
The contents will probably change up (I don't have any graphite pencil sets, charcoal or pastels in here currently) but that is it for now.
Do you have a creative toolkit?
What's in your bag? Share some of your own favorite tools below!